Ryzen Build - Update
In my previous article “Ryzen Build”, I detailed the specification of my pending PC upgrade, which will replace my ageing Intel i7-6700K from 2016.
This article will focus on the build itself and my initial testing.
Specification
As a reminder, the full specification of my new PC can be found below.
- MSI MAG X570 Tomahawk WiFi
- AMD Ryzen 9 3950X 3.5GHz Base / 4.7GHz Boost (16C/32T)
- Noctua NH-D15 CPU Cooler
- 64GB Patriot Viper Steel DDR4-3600 (18-20-20-38)
- 1TB Samsung 980 Pro M.2 PCI-e 4.0 NVM-e SSD
- 1TB Samsung PM981 M.2 PCI-e 3.0 NVM-e SSD
- PNY GeForce RTX 2080 Ti 11GB XLR8 Gaming Overclocked Edition
- EVGA SuperNova P2 1000W ‘80 Plus Platinum’ PSU
- Phanteks Enthoo Evolv ATX Mid Tower Case
Thankfully, I was able to reuse a lot of components from my existing PC, specifically the case, power supply unit and graphics card. Not only did this reduce the cost of the upgrade (approximately £1000), but also simplified the build process, as the power supply unit and I/O cables were already connected, routed, and mounted.
Build
I started the build process by installing the AMD Ryzen 3950X processor, Patriot Viper Steel memory, Samsung 980 Pro SSD and the Samsung PM981 SSD. This included the two SSD heatsinks, supplied with the MSI MAG X570 Tomahawk WiFi motherboard.
The photo below shows the Samsung 980 Pro SSD installed before the heatsink was mounted.
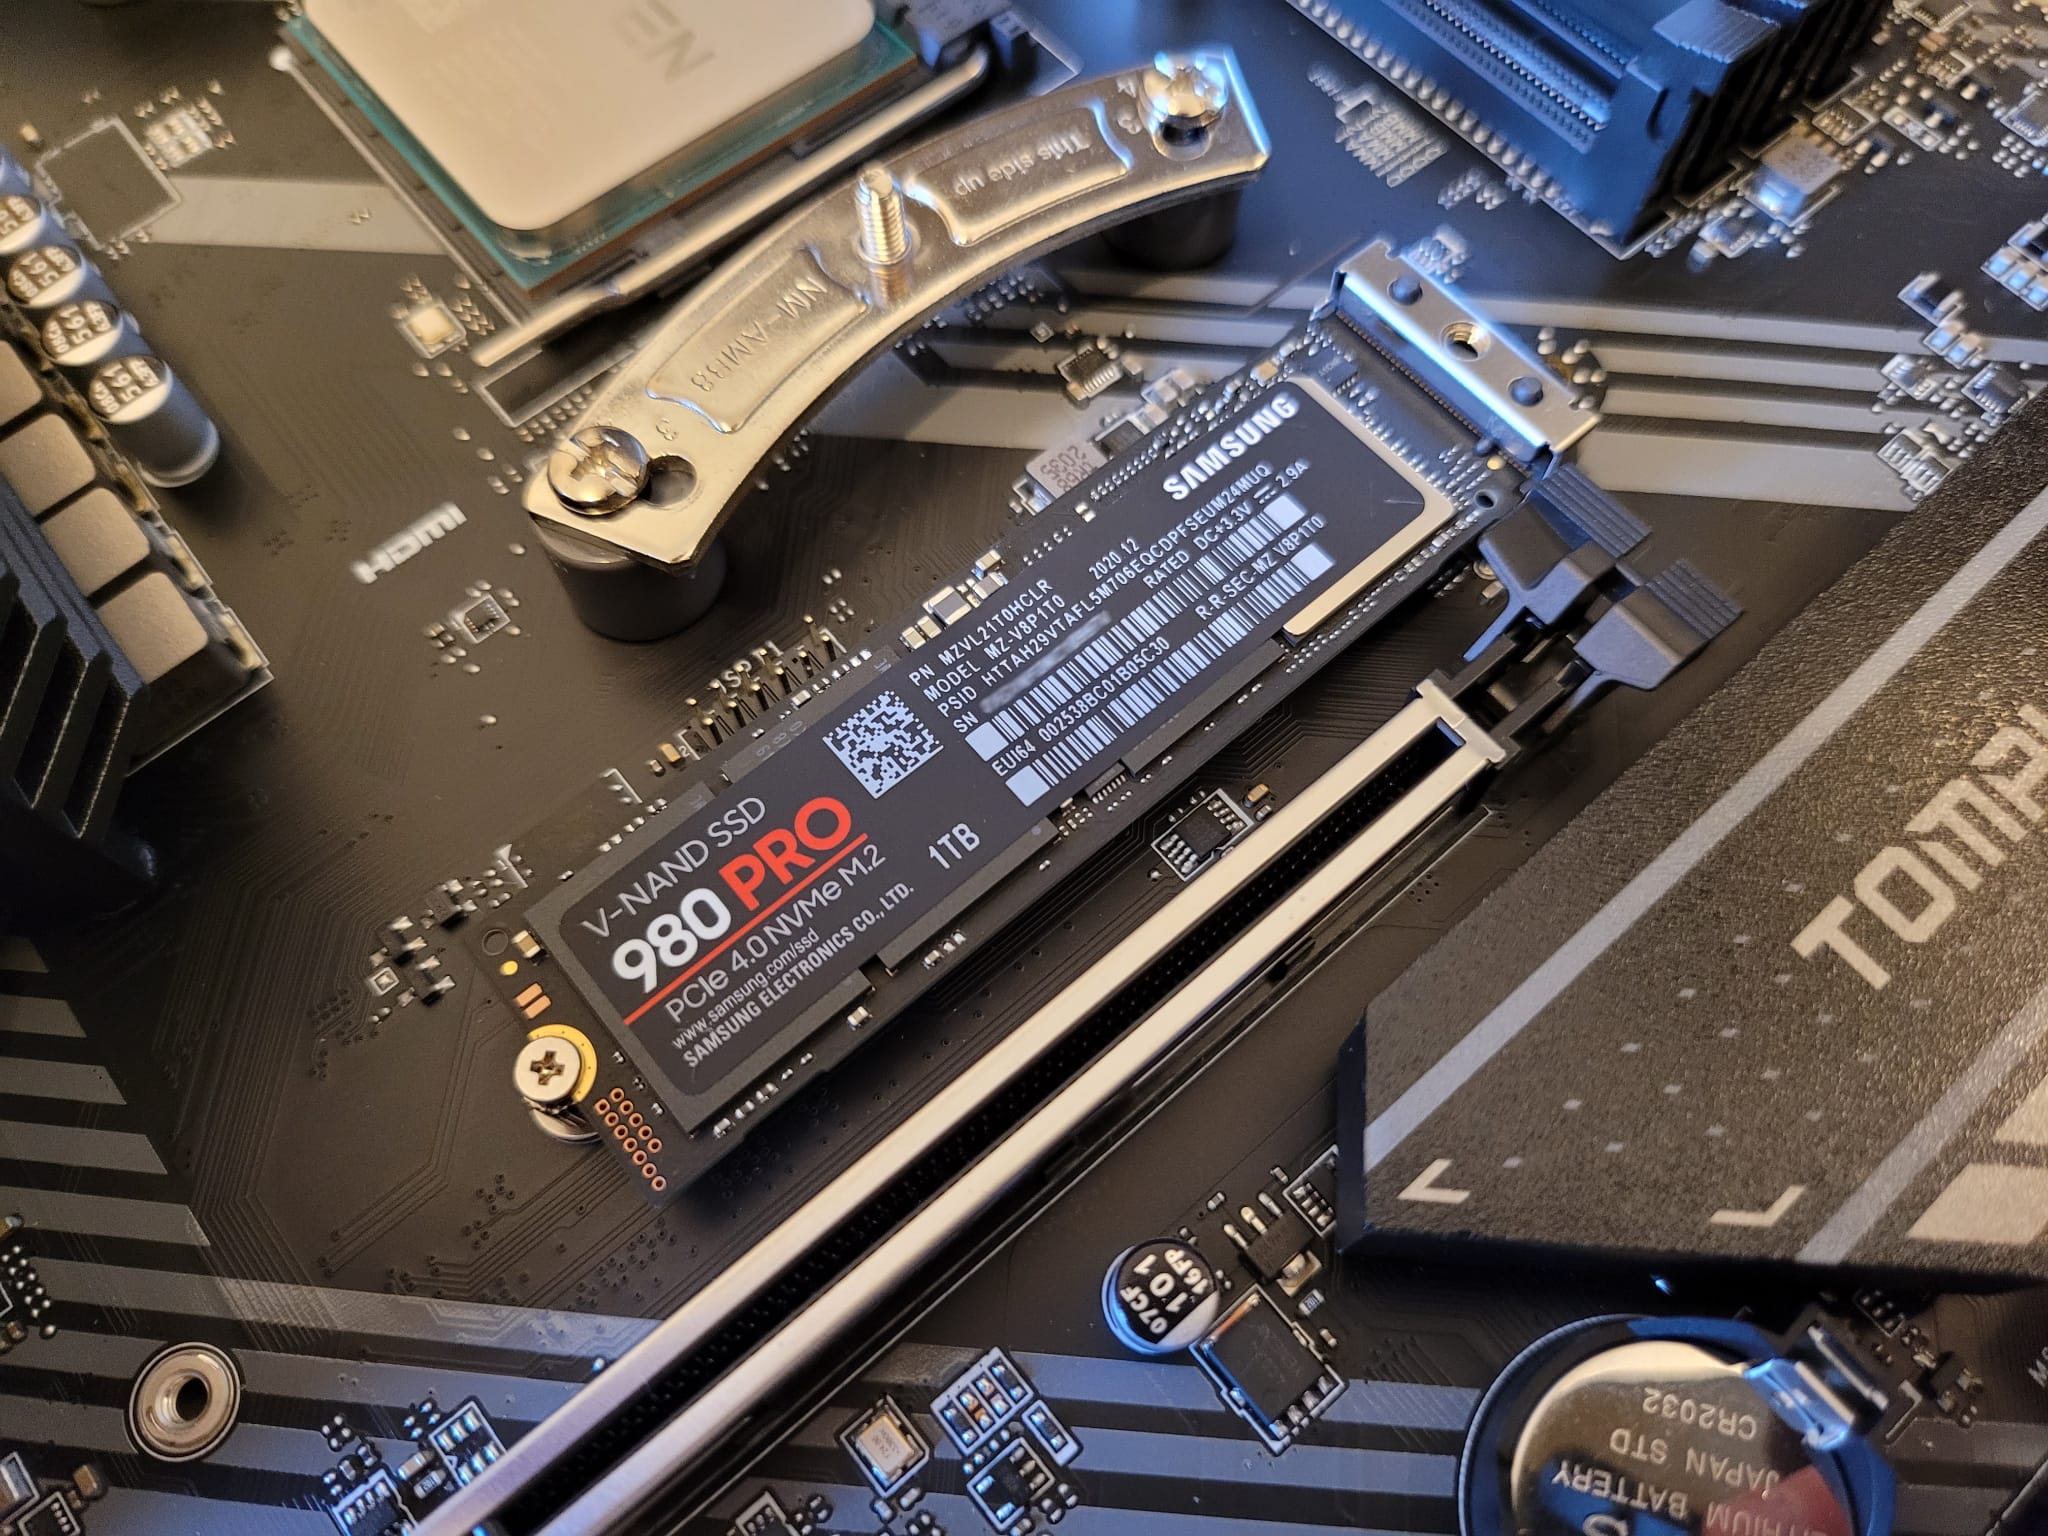
The Samsung 980 Pro SSD delivers impressive performance, with up to 7,000MB/s read and 5,100MB/s write.
Once complete, I mounted the motherboard in the case and connected the EVGA SuperNova P2 1000W power supply unit. The MSI MAG X570 Tomahawk WiFi motherboard requires the standard 24-pin ATX power connector, 8-pin auxiliary connector, as well as an additional 4-pin connector.
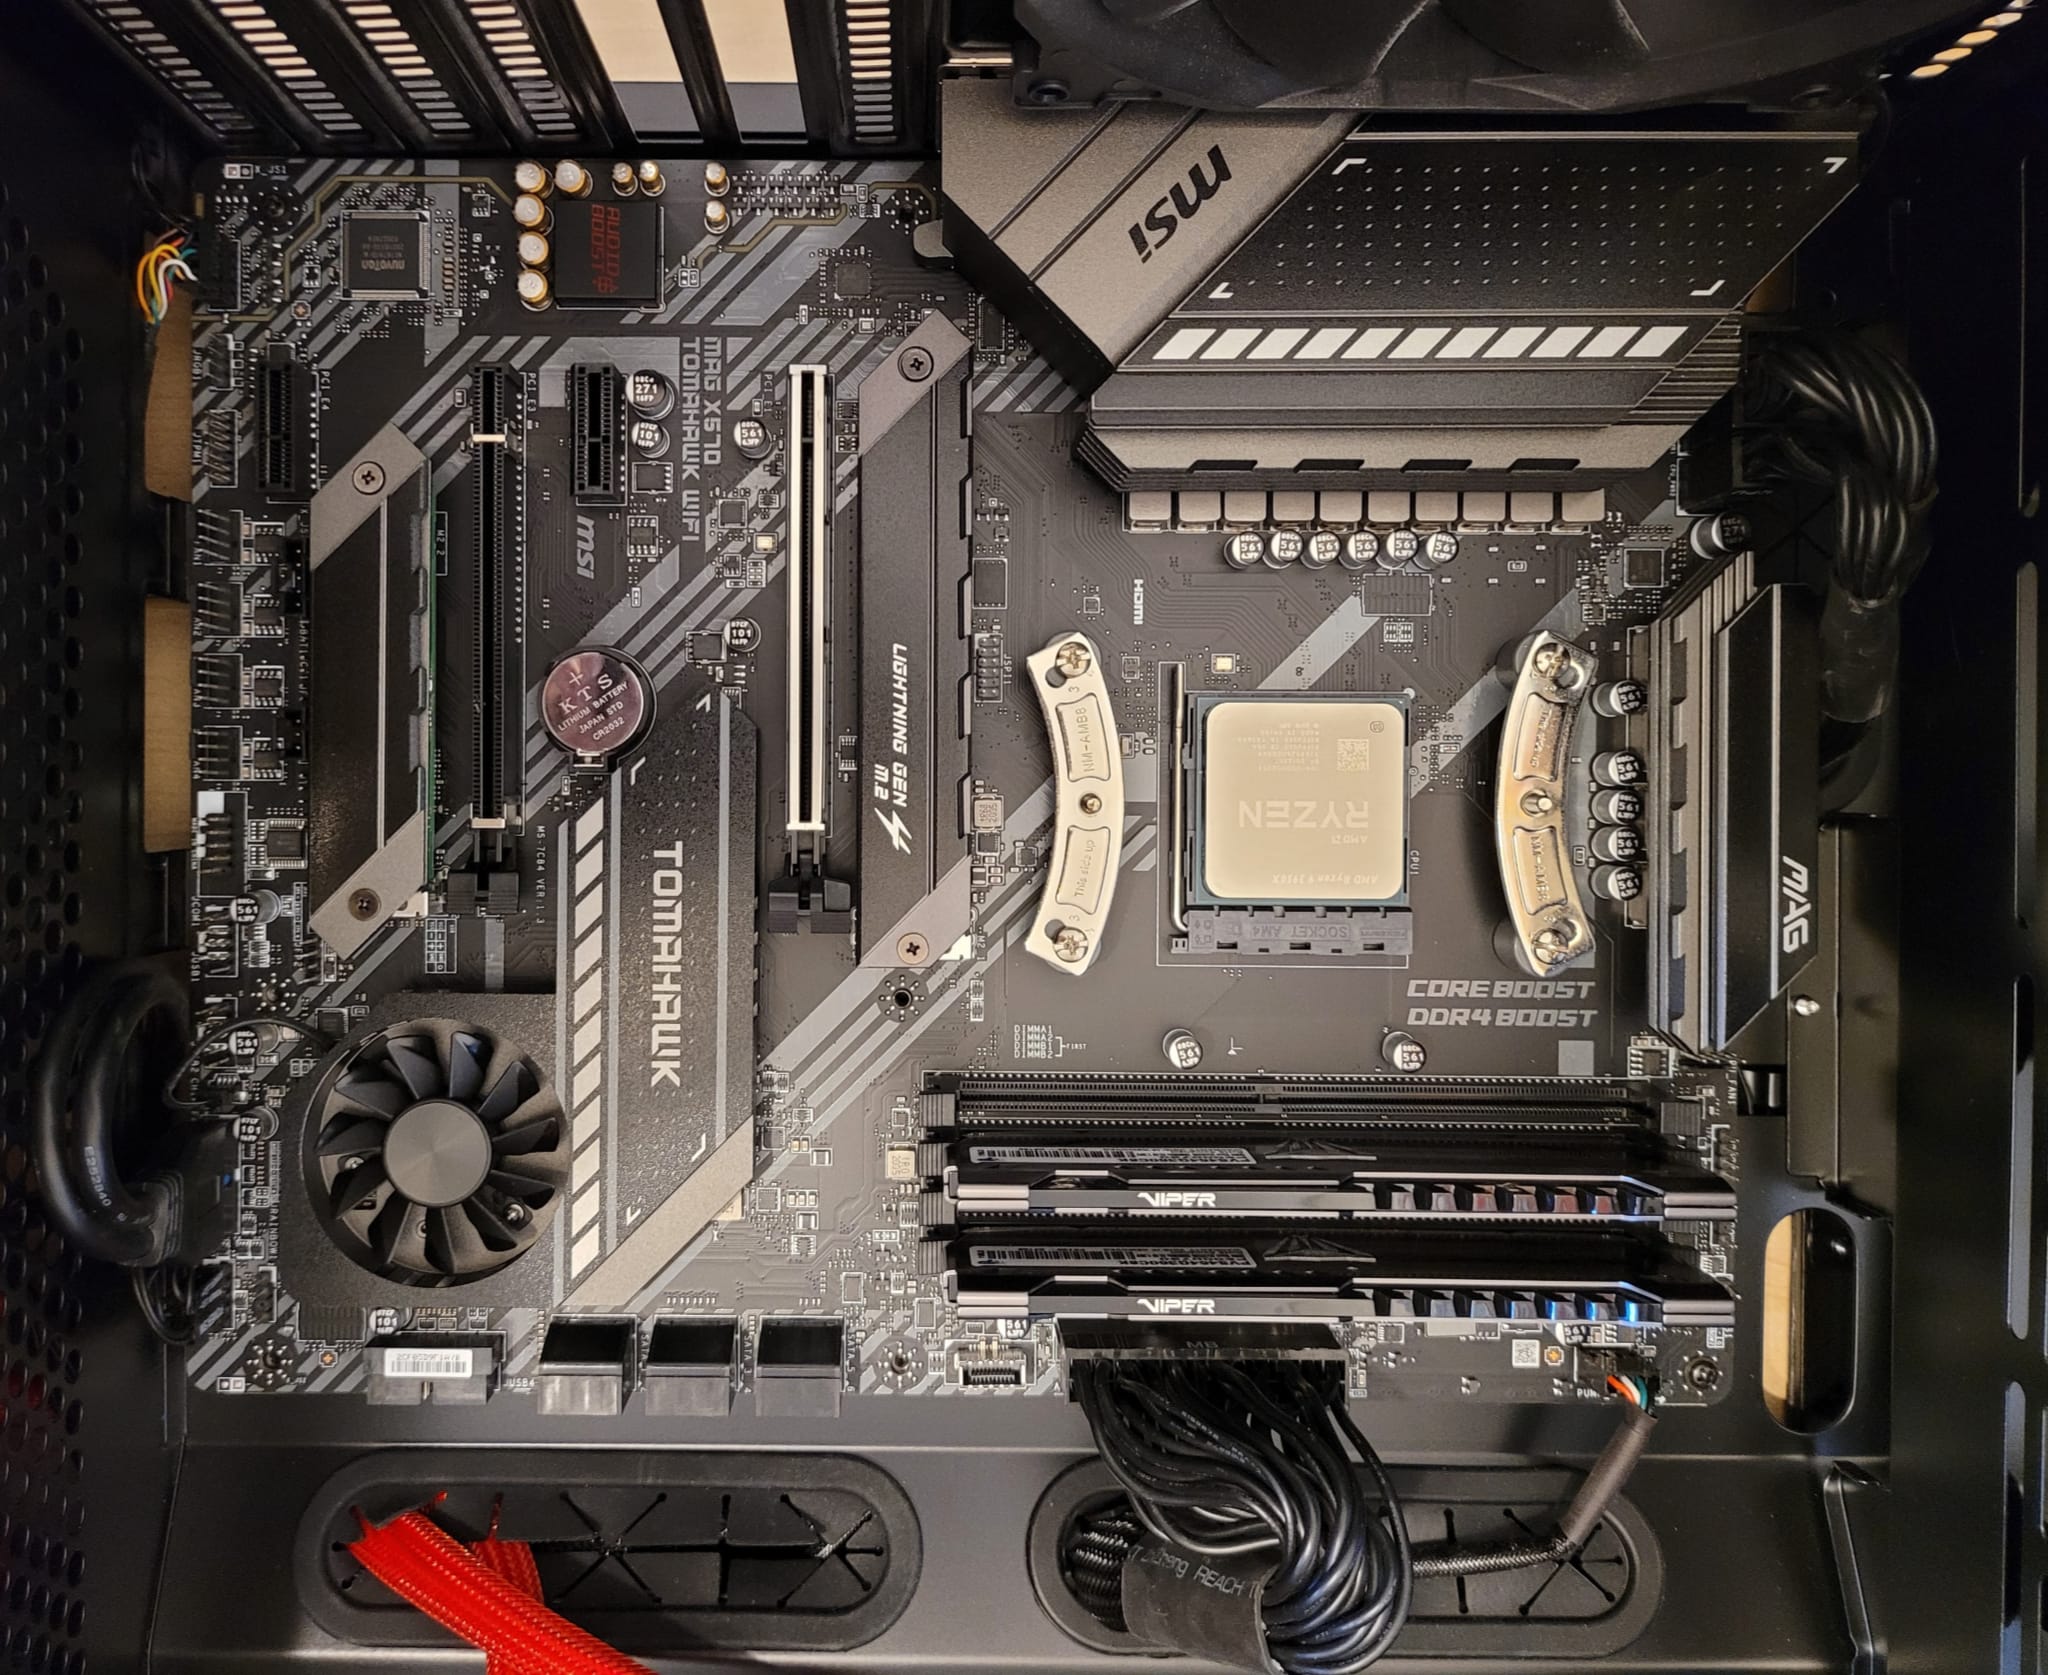
Thankfully I had all of the required power supply unit modular cables, even though my existing Intel i7-6700K PC did not require the additional 4-pin connector.
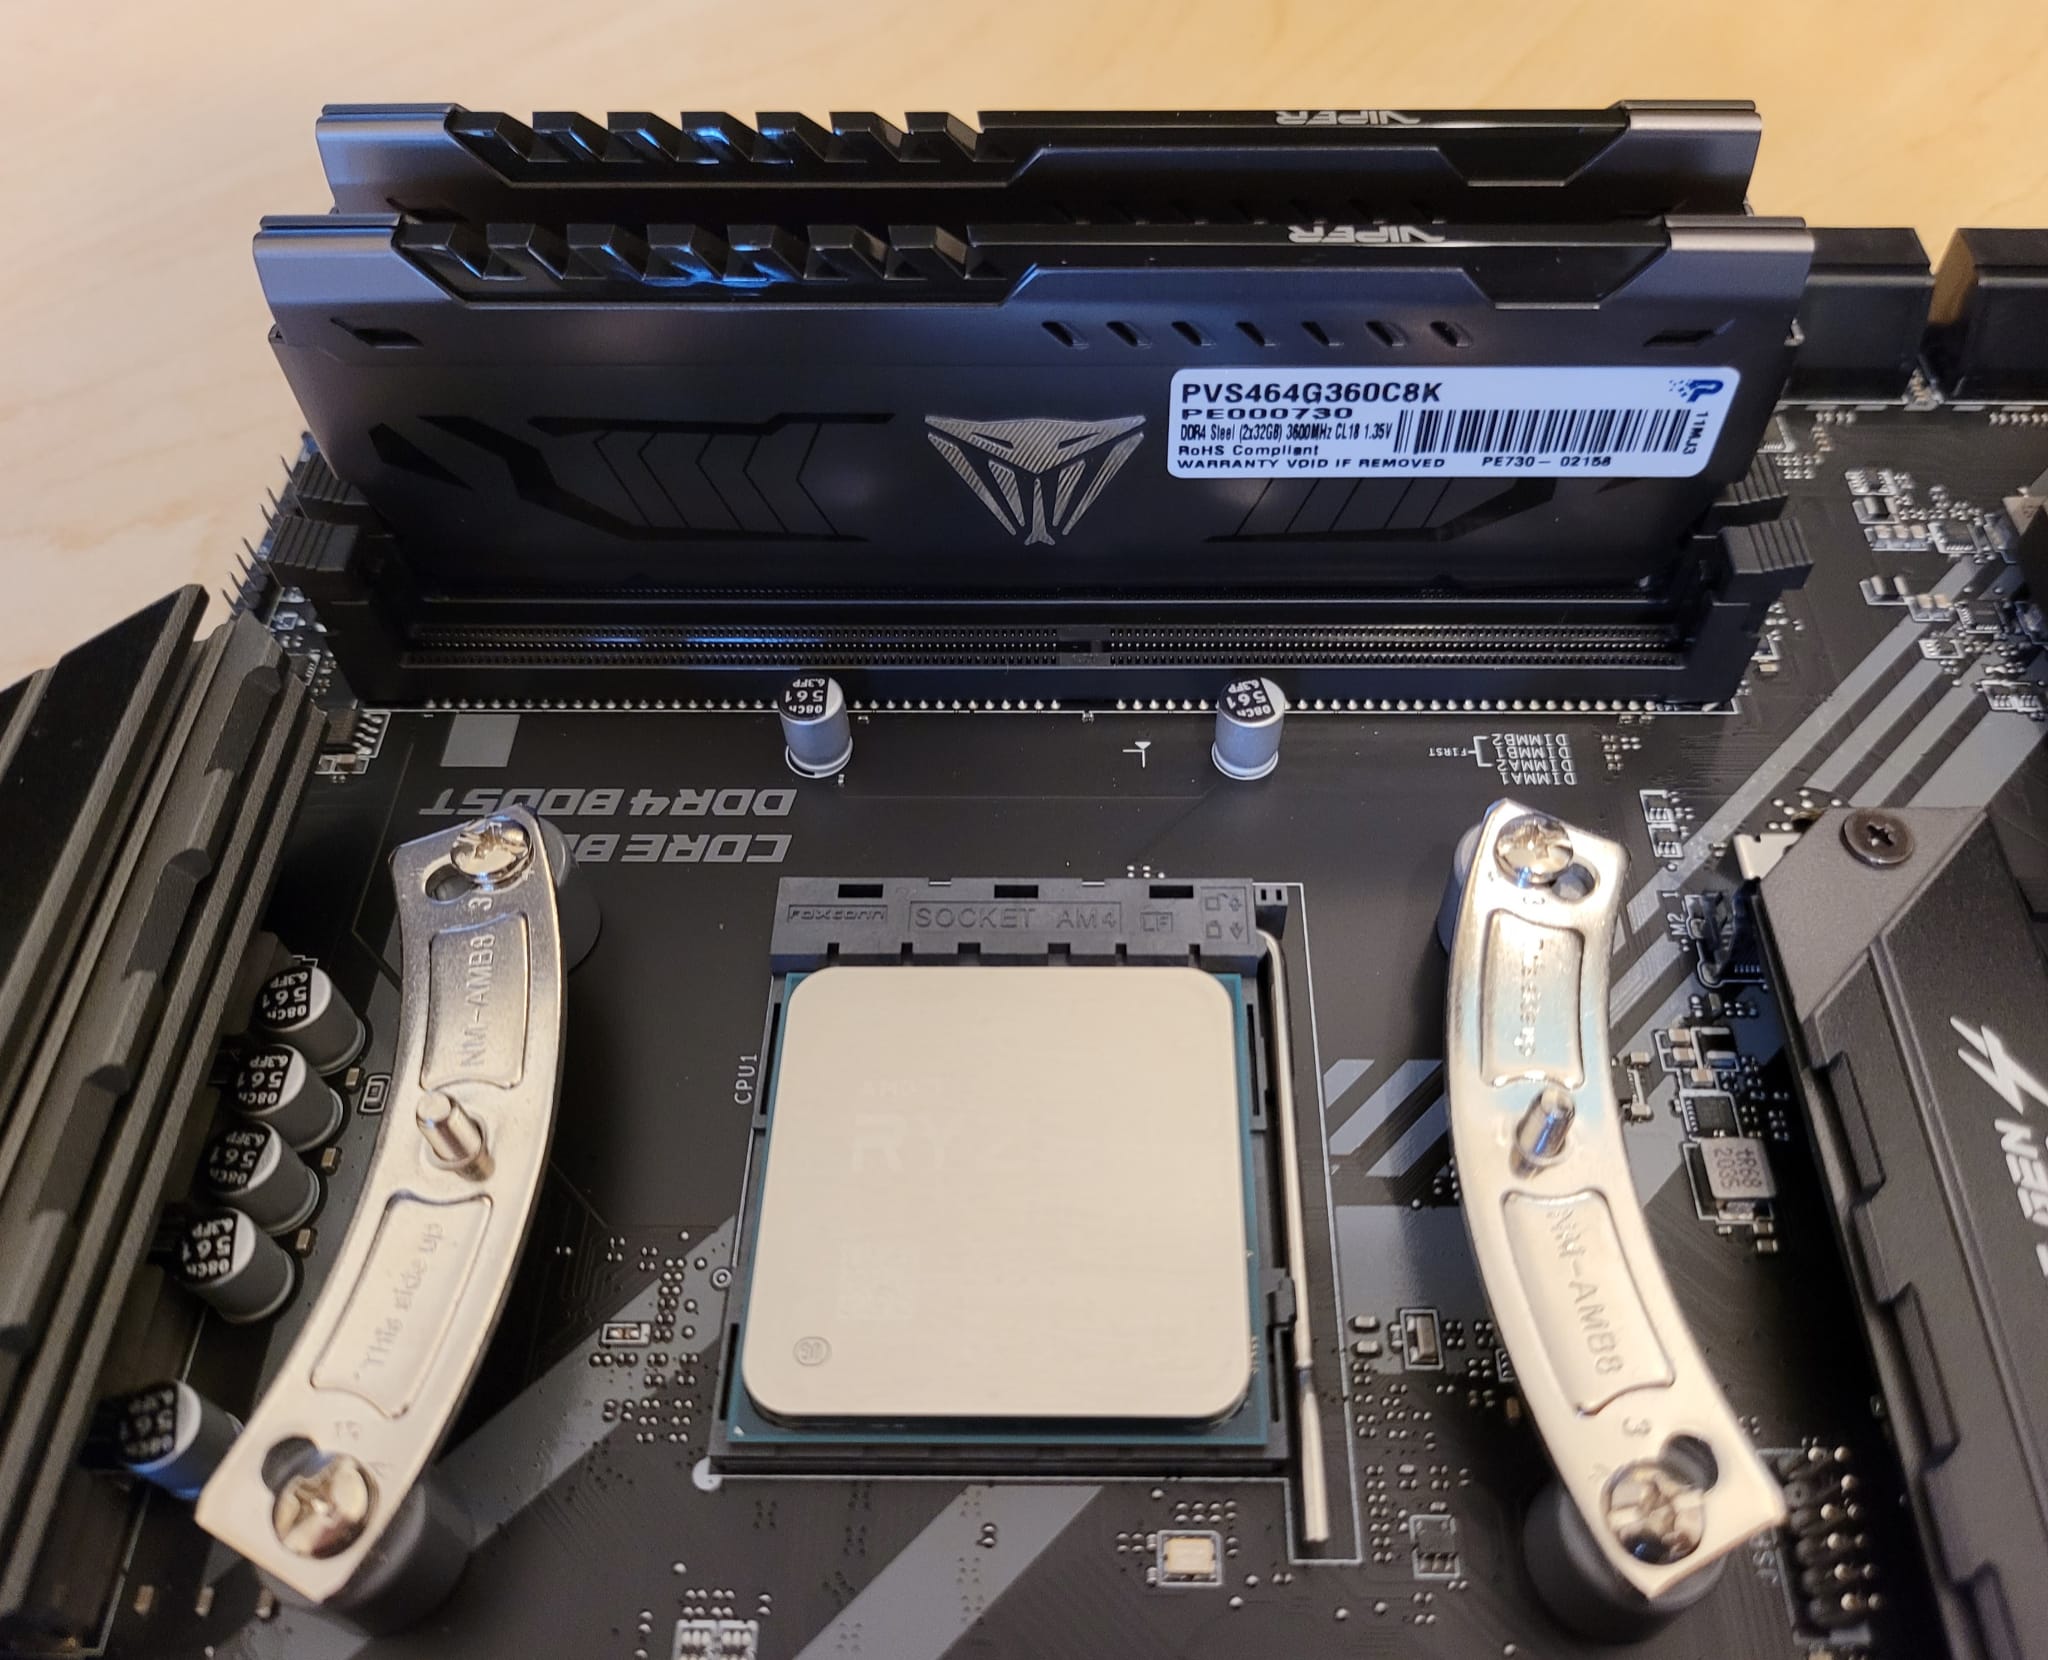
The photo below shows the processor and memory, with the Noctua NH-D15 AM4 mounting bracket ready for the heatsink. Recognising the size of the Noctua NH-D15 cooler, this is likely the last photo that delivers a clear view of the installed processor and memory.
The next phase of the build is always the most nerve-racking, applying the thermal paste and installing the Noctua NH-D15 cooler. In reality, testing has shown that if you are using a processor with an integrated heat spreader (like the AMD Ryzen 3950X), the risk of incorrectly applying thermal paste is relatively low. Therefore, I proceeded with the “pea-sized blob” method, which has served me well in the past.
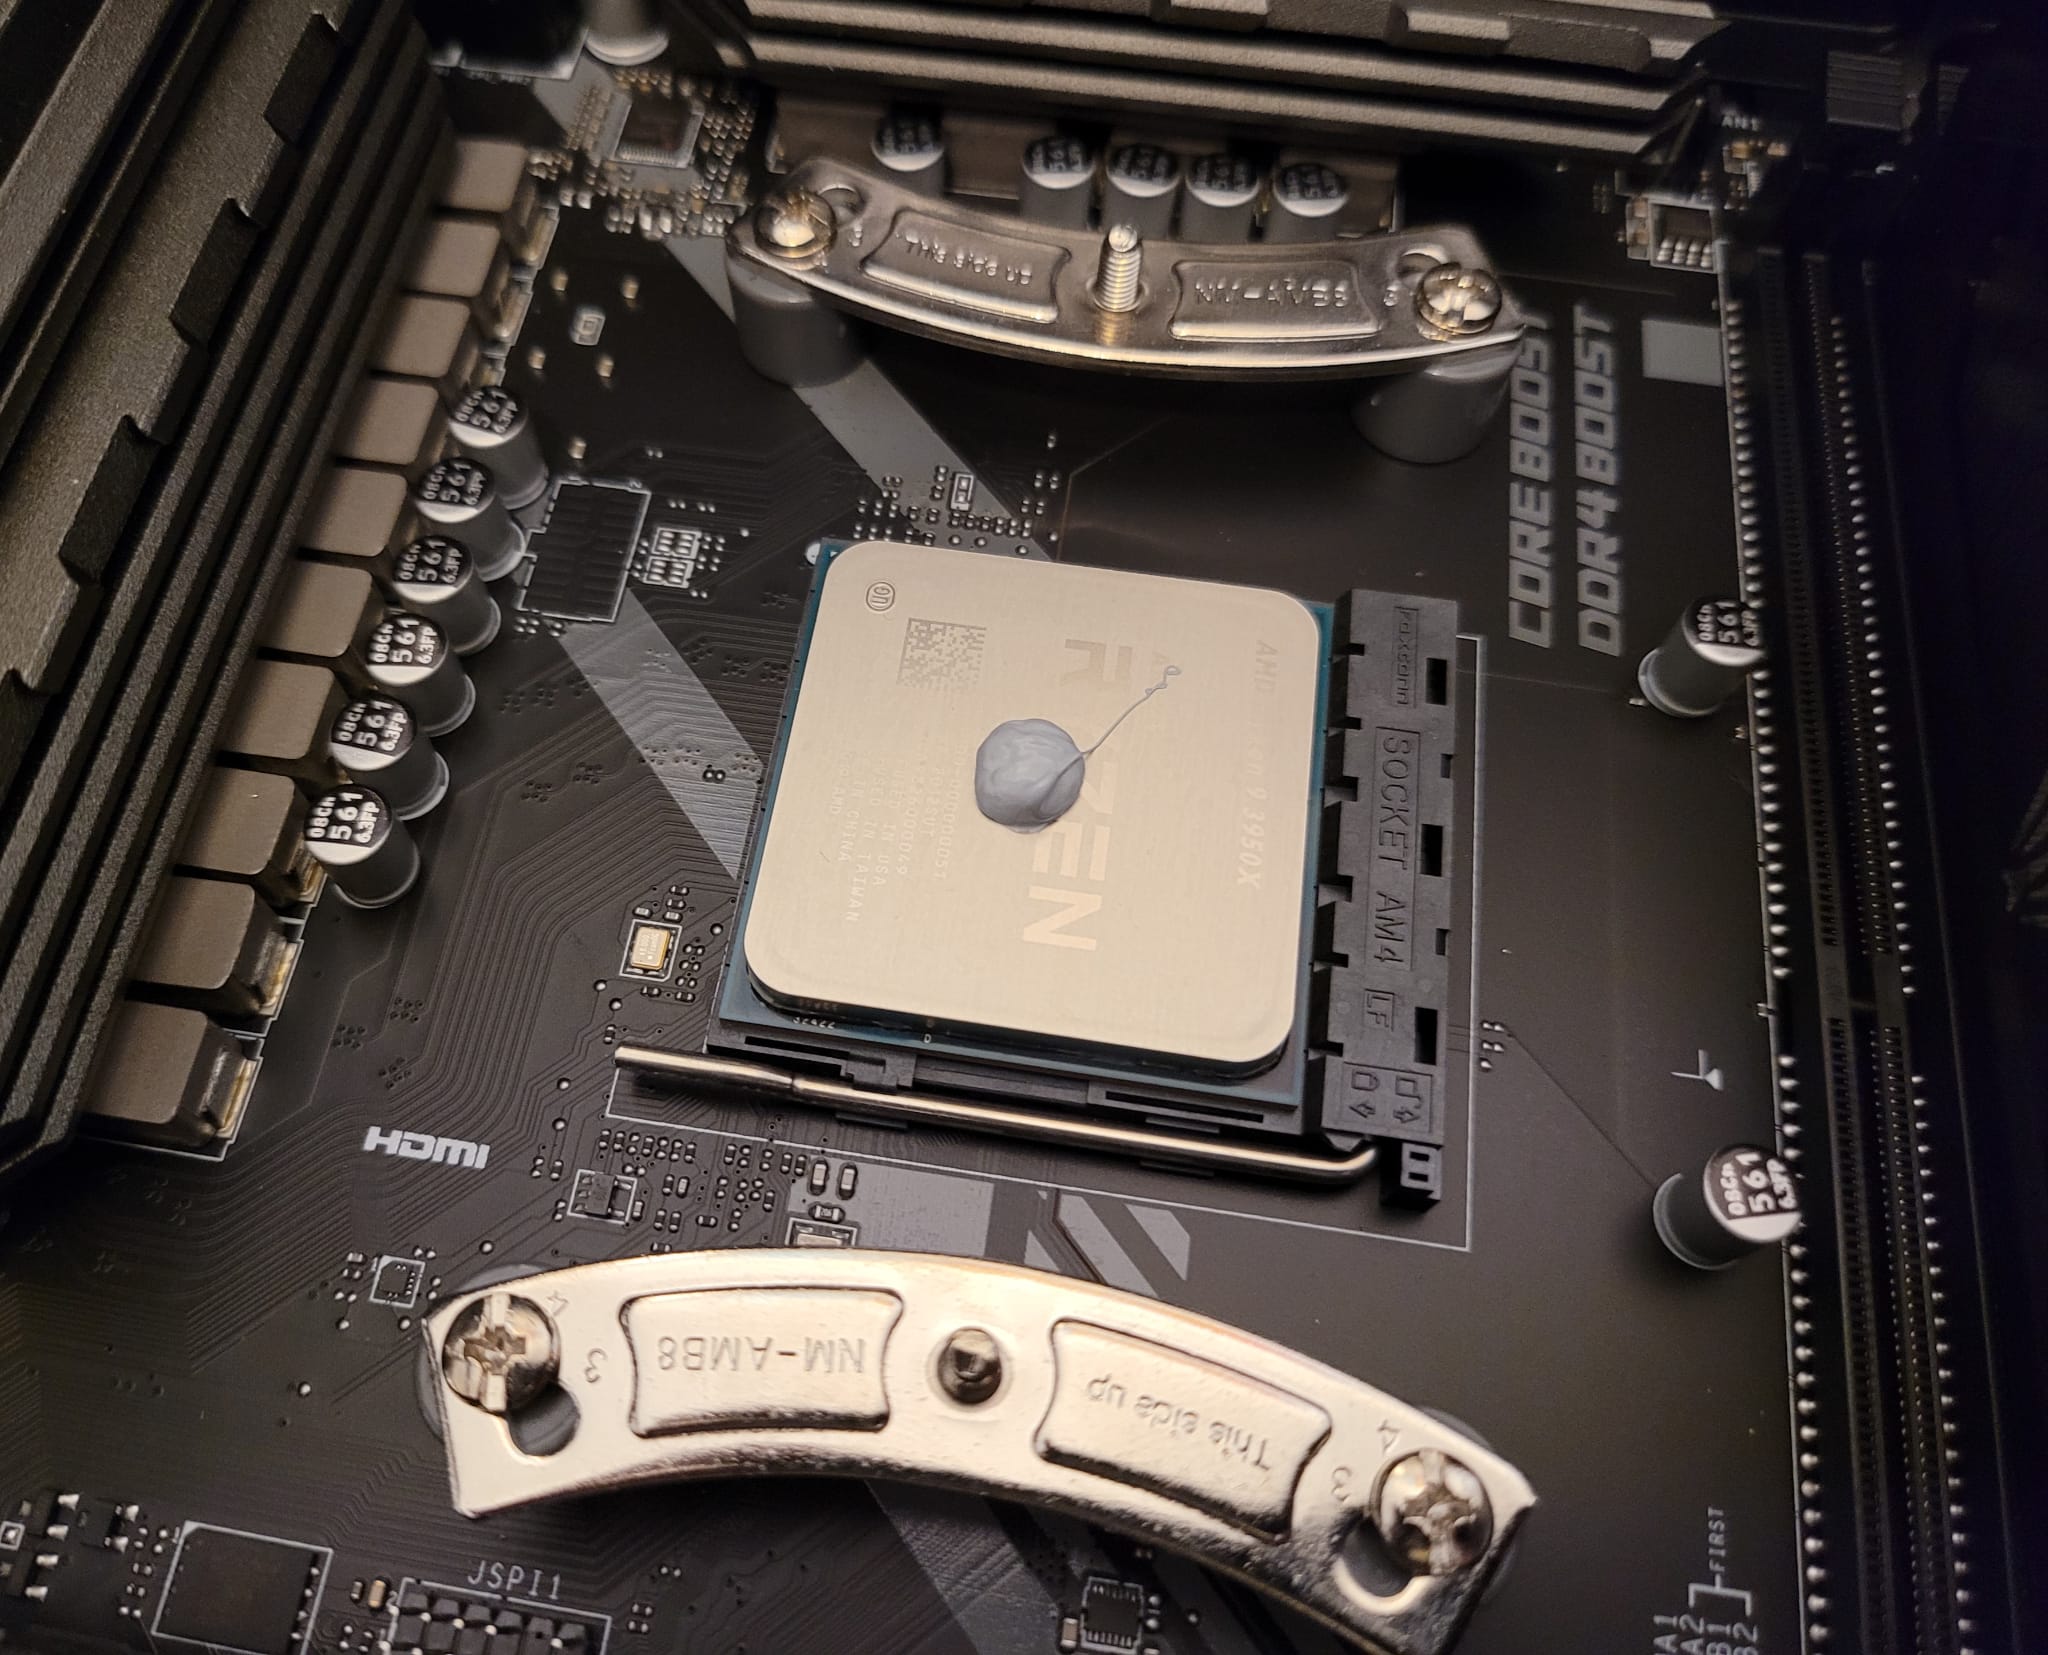
I did not use the included Noctua NT-H1 thermal paste, instead, I selected Thermal Grizzly Kryonaut High-Performance Thermal Paste. This is a personal preference, which I suspect has minimal real-world impact on temperatures.
Once complete, I mounted the massive Noctua NH-D15 cooler.
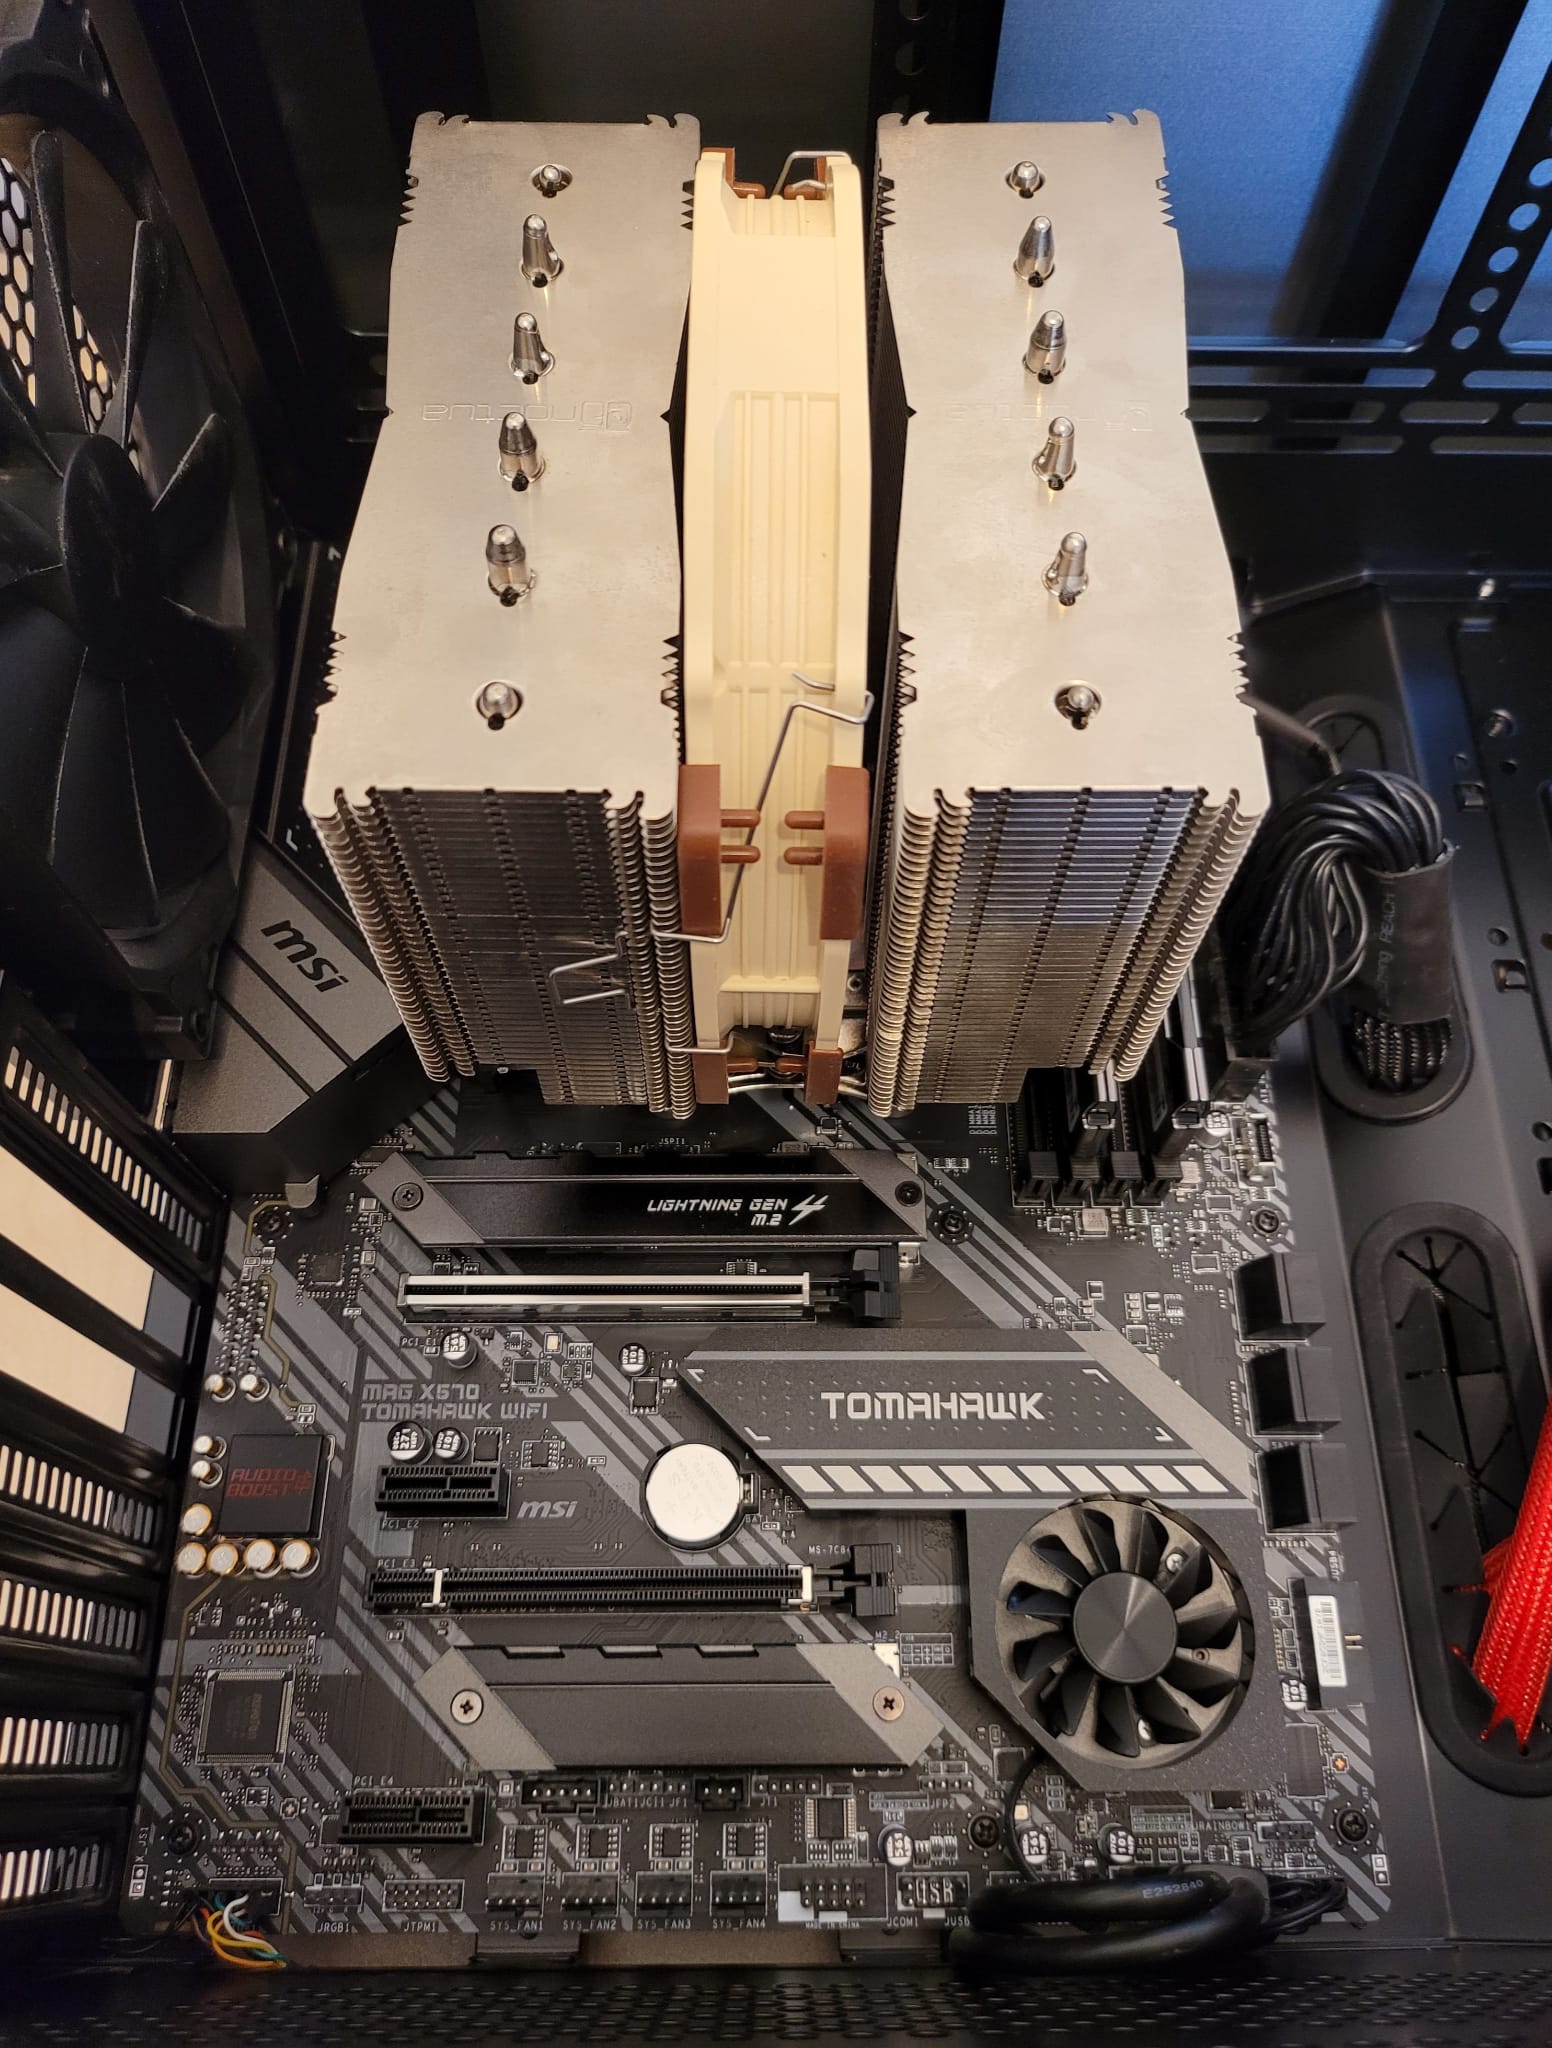
Next, I installed the PNY GeForce RTX 2080 Ti graphics card, which due to the size and weight has visible flex when the case is stood vertically (likely occurred over the past two-years of usage).
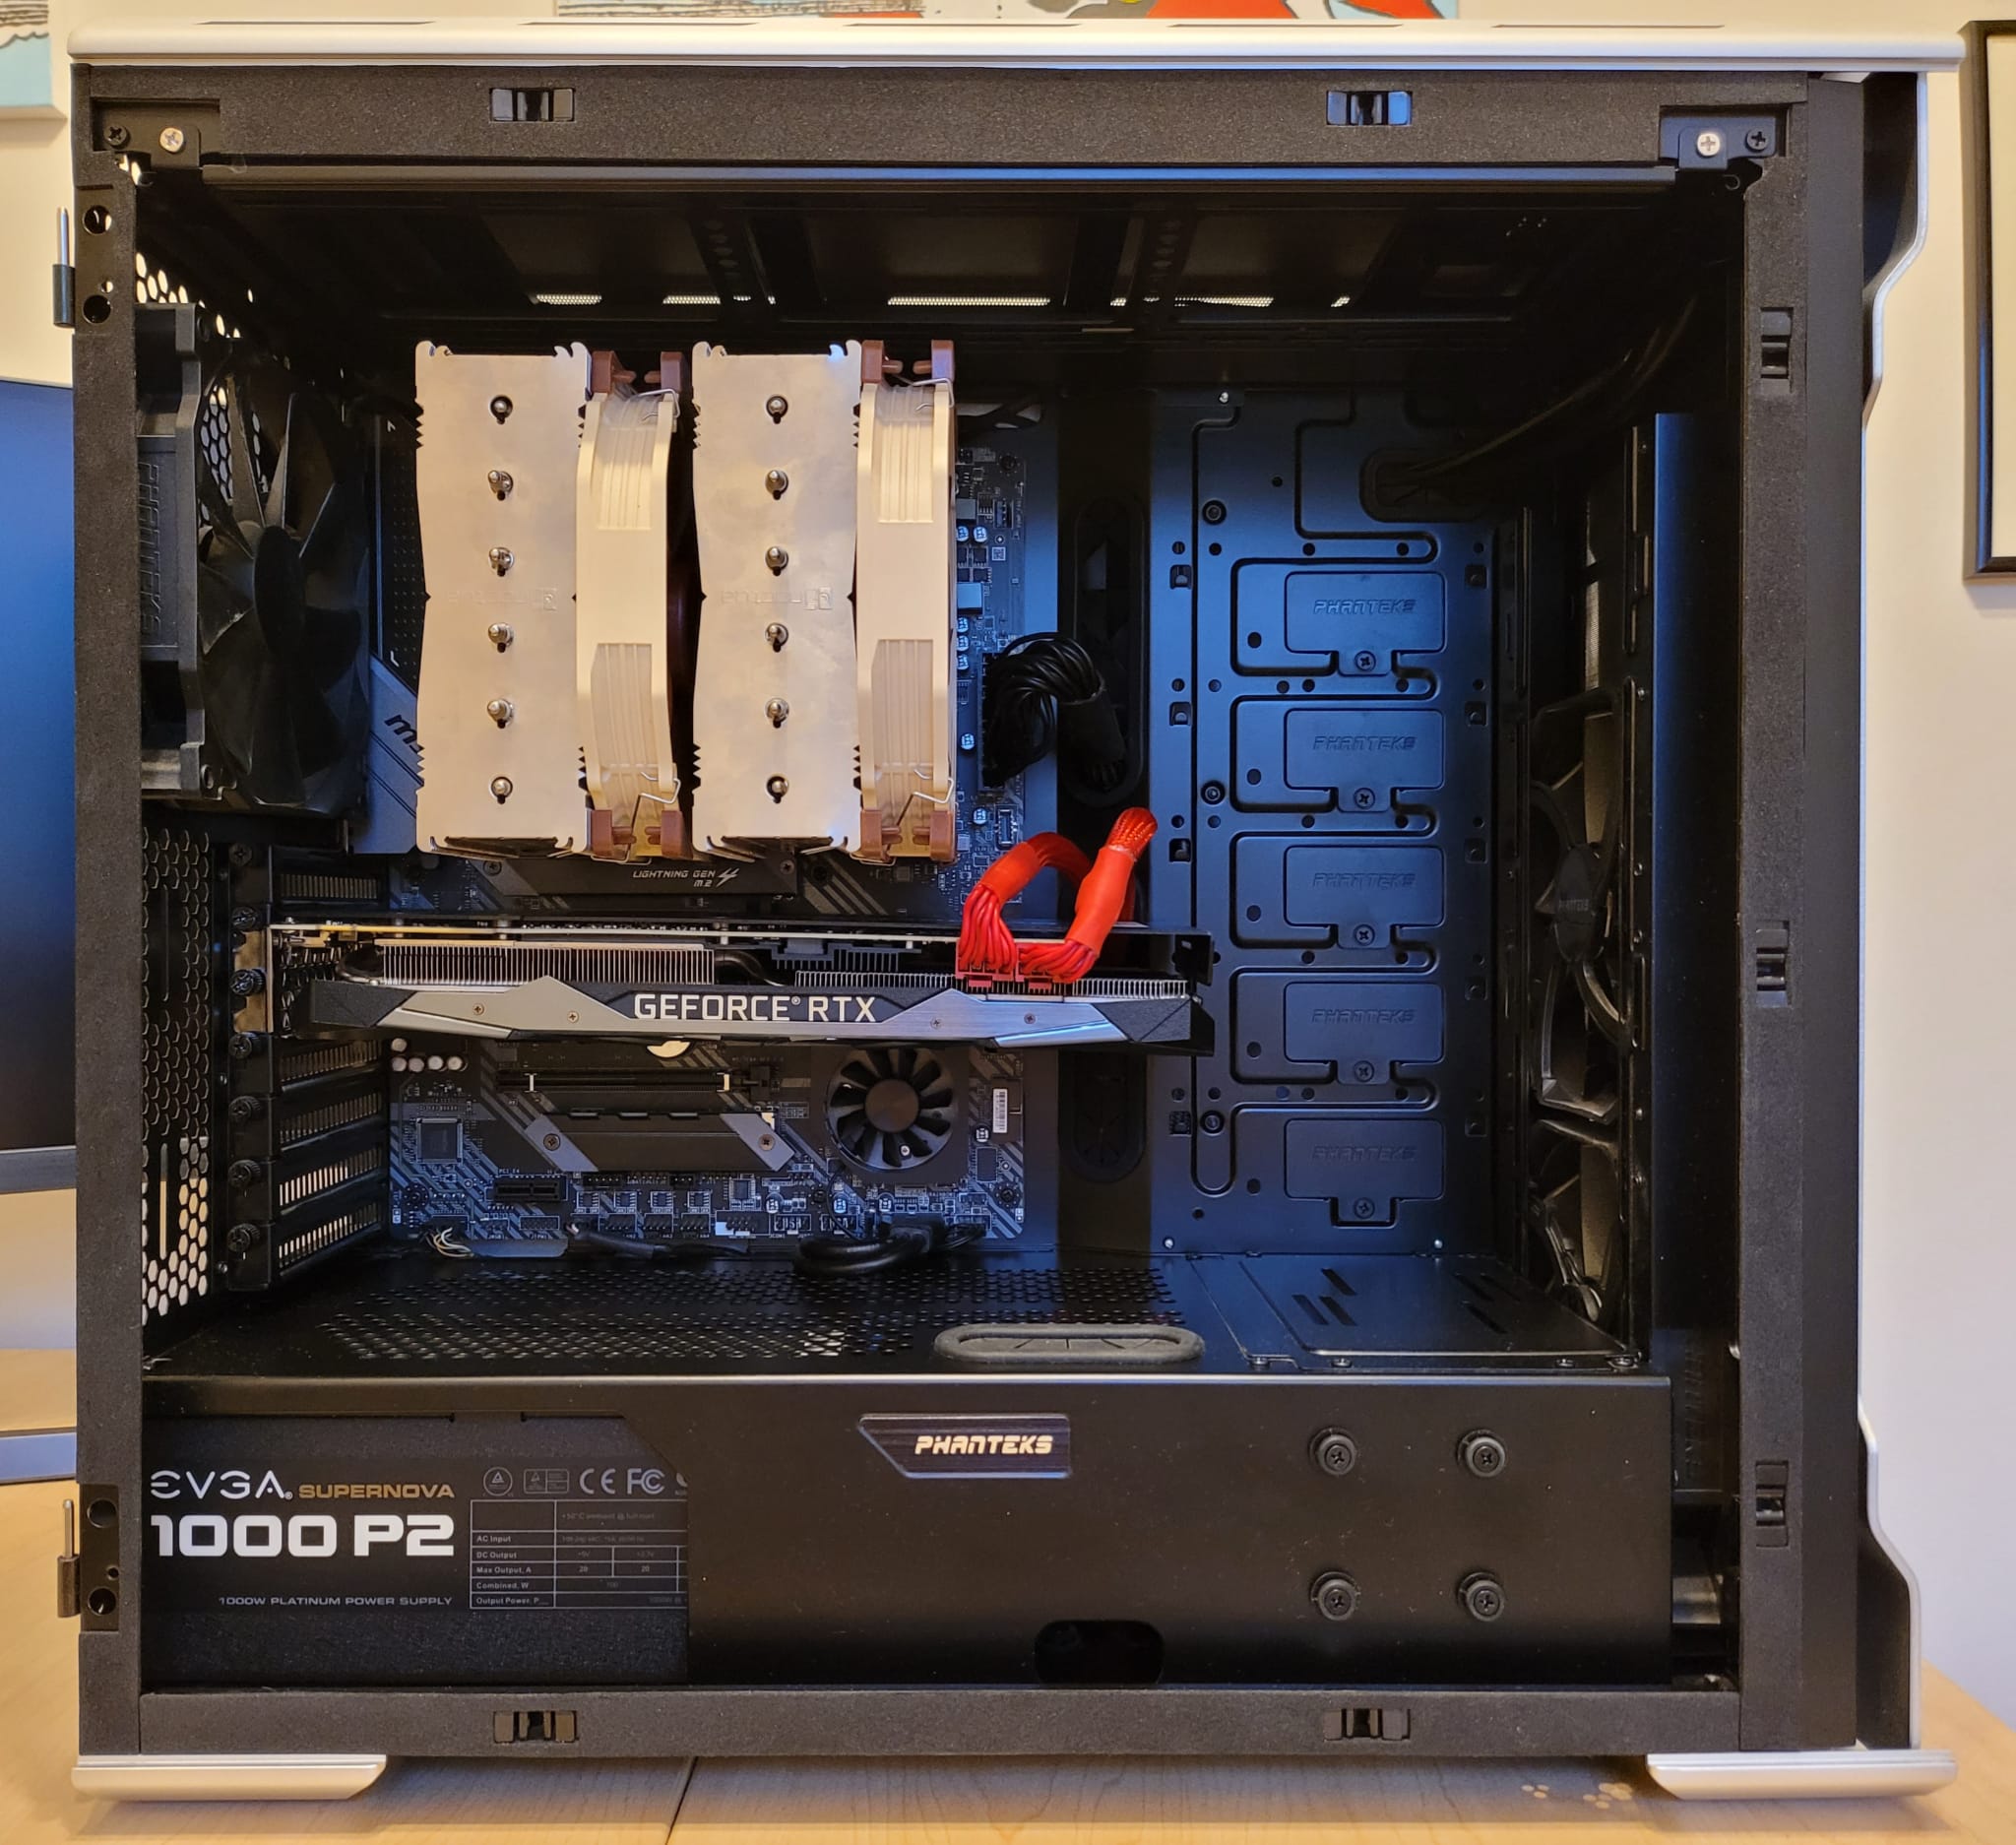
Finally, I connected and validated all motherboard connections, specifically the power supply unit, fans, I/O, etc.
Overall, I am pleased with the build, which is relatively clean thanks to the majority of the cables being routed via the back-panel of the case.
Regarding cooling, the air is drawn in from the front of the case, running over the motherboard, processor and graphics card, before being pushed out of the rear.
Testing
With the build complete, I switched my focus to testing, specifically optimising the BIOS settings, processor and memory frequencies, as well as the memory timings (which for Ryzen-based systems can have a significant impact on performance).
Unfortunately, I immediately encountered an issue with the Patriot Viper Steel memory, which refused to POST with the XMP profile enabled (either via the XMP option or manually defined).
I knew this was a risk when purchasing the memory, which was not officially “approved” by MSI. Memory compatibility is a real lottery with motherboard manufacturers, with each manufacture configuring the sub-timings and voltages slightly differently, which can impact performance and stability.
This issue forced an undesirable amount of testing, requiring systematically testing of memory frequencies, timings, and voltages.
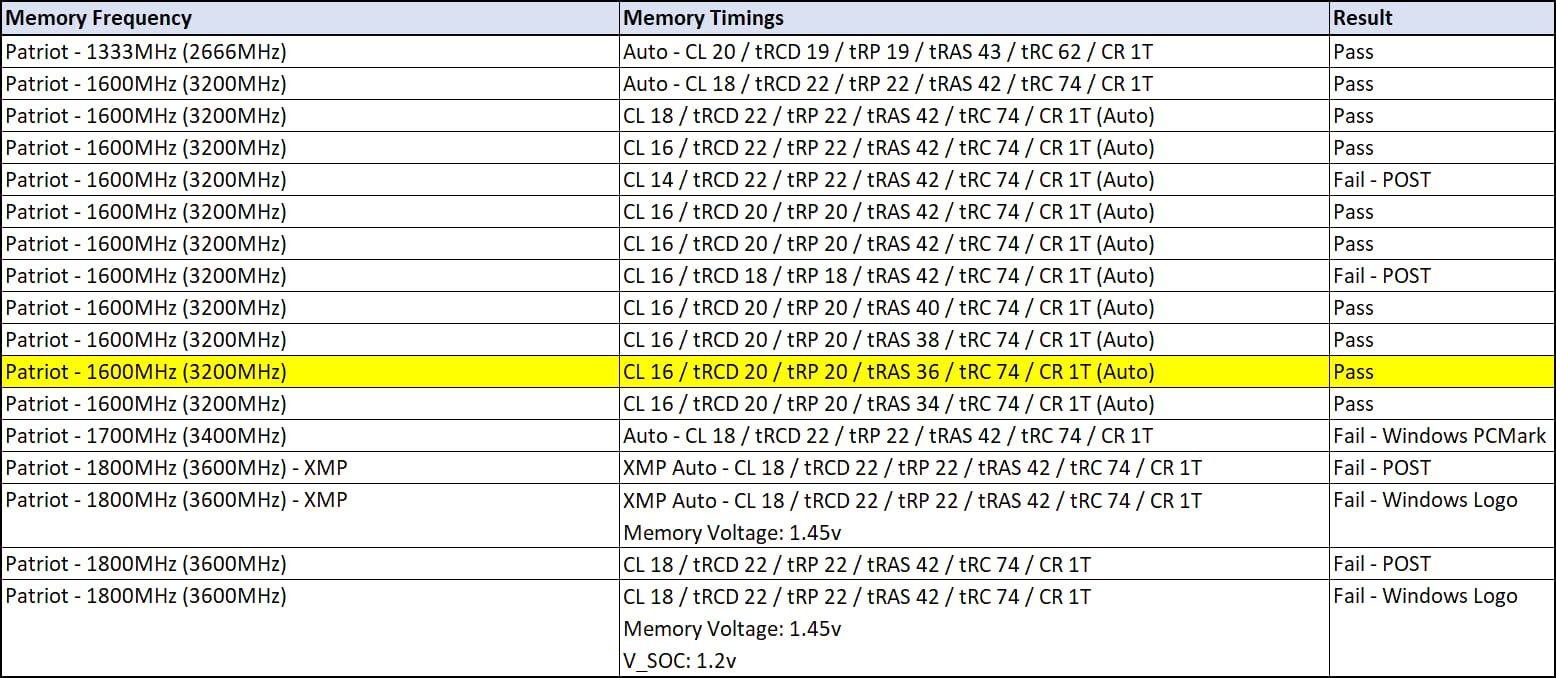
The best I could achieve (stable) with the Patriot Viper Steel memory was 1600MHz (3200MHz) at CL 16 / tRCD 20 / tRP 20 / tRAS 36 / tRC 74 / CR 1T. No amount of additional voltage (memory and/or controller) achieved improved stability.
I had already confirmed the FCLK (Infinity Fabric) was stable at 1800MHz, therefore I was disappointed not to be able to raise the memory frequency above 1600MHz. The tighter timings did help offset the performance impact, but it was still far from ideal (and below the manufacturer specification of the memory).
With these memory settings and a 1:1 Memory and FCLK frequency, I achieved the following benchmark results.
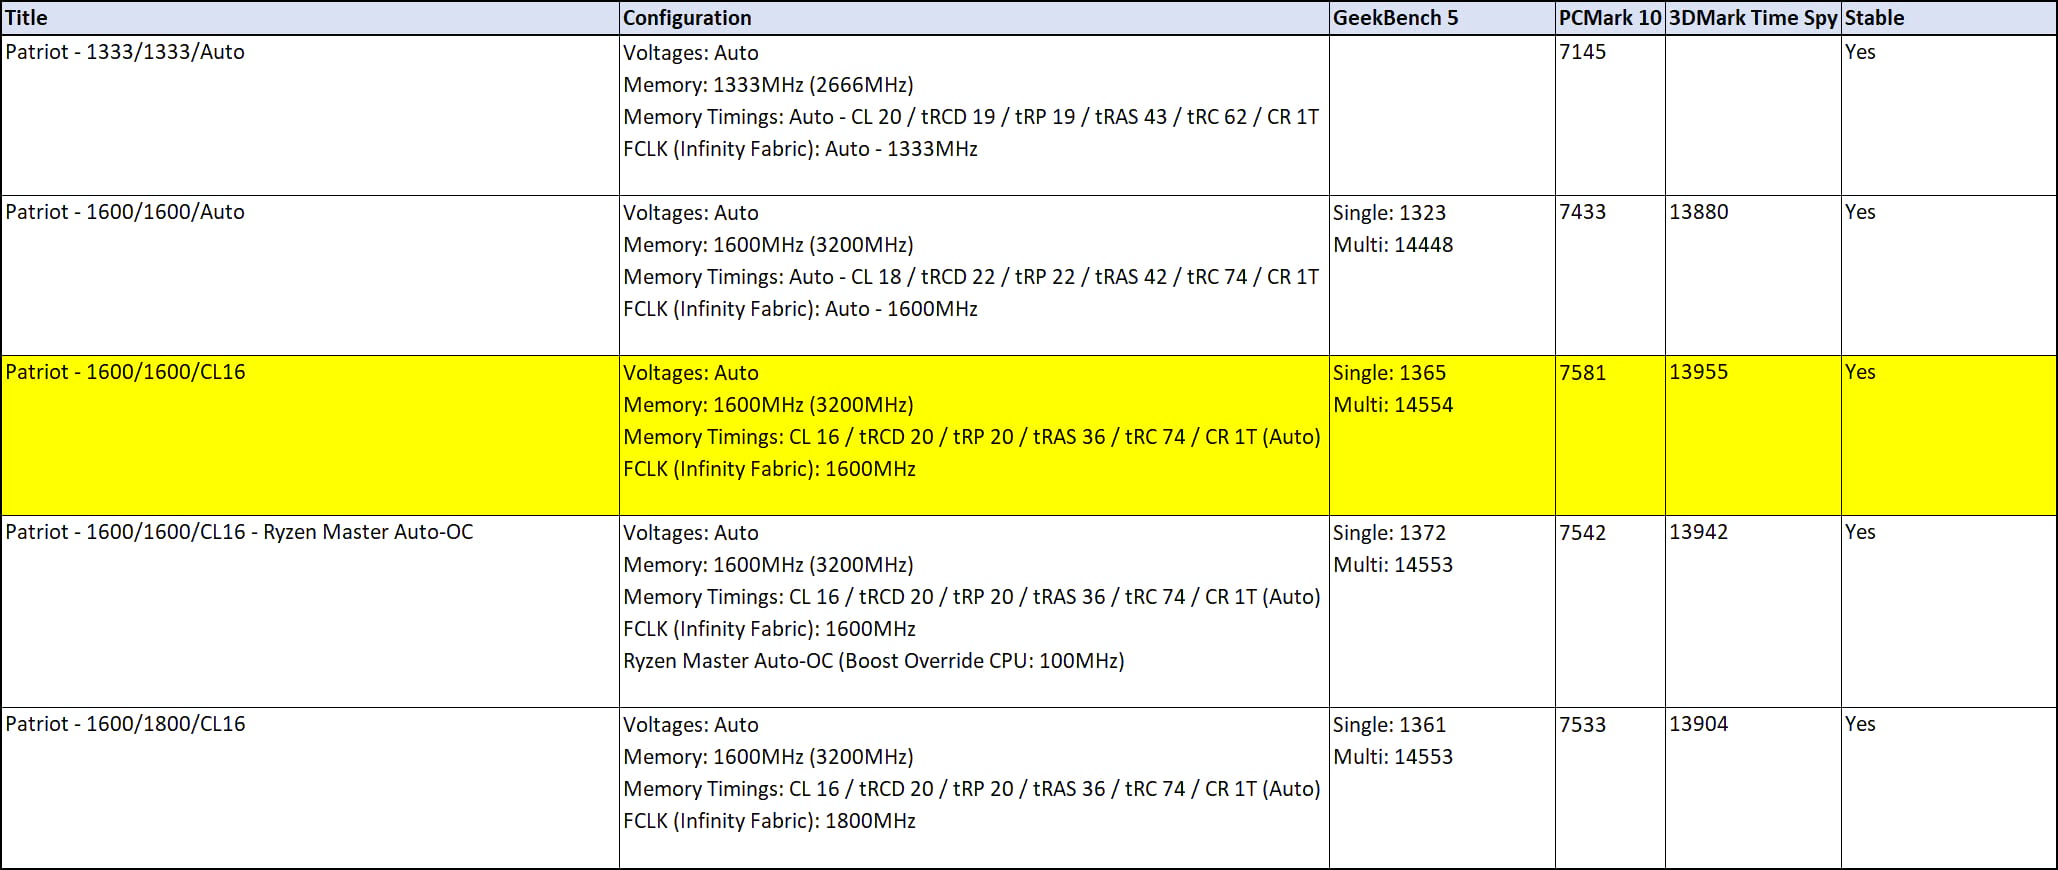
Although the results are certainly acceptable, I was disappointed by the memory compatibility, therefore I decided to RMA the Patriot Viper Steel memory, replacing it with the more expensive (+ £70) Corsair Vengeance LPX 64GB DDR4 PC4-28800C18 3600MHz memory.
On paper, the Corsair Vengeance LPX is identical to the Patriot Viper Steel, with a 1800MHz (3600MHz) frequency and CL 18 timings. However, the Corsair Vengeance LPX is officially approved by MSI.
Thankfully, by disconnecting one fan from the Noctua NH-D15 cooler, the memory could be swapped without removing the heatsink (which would have been a real pain).
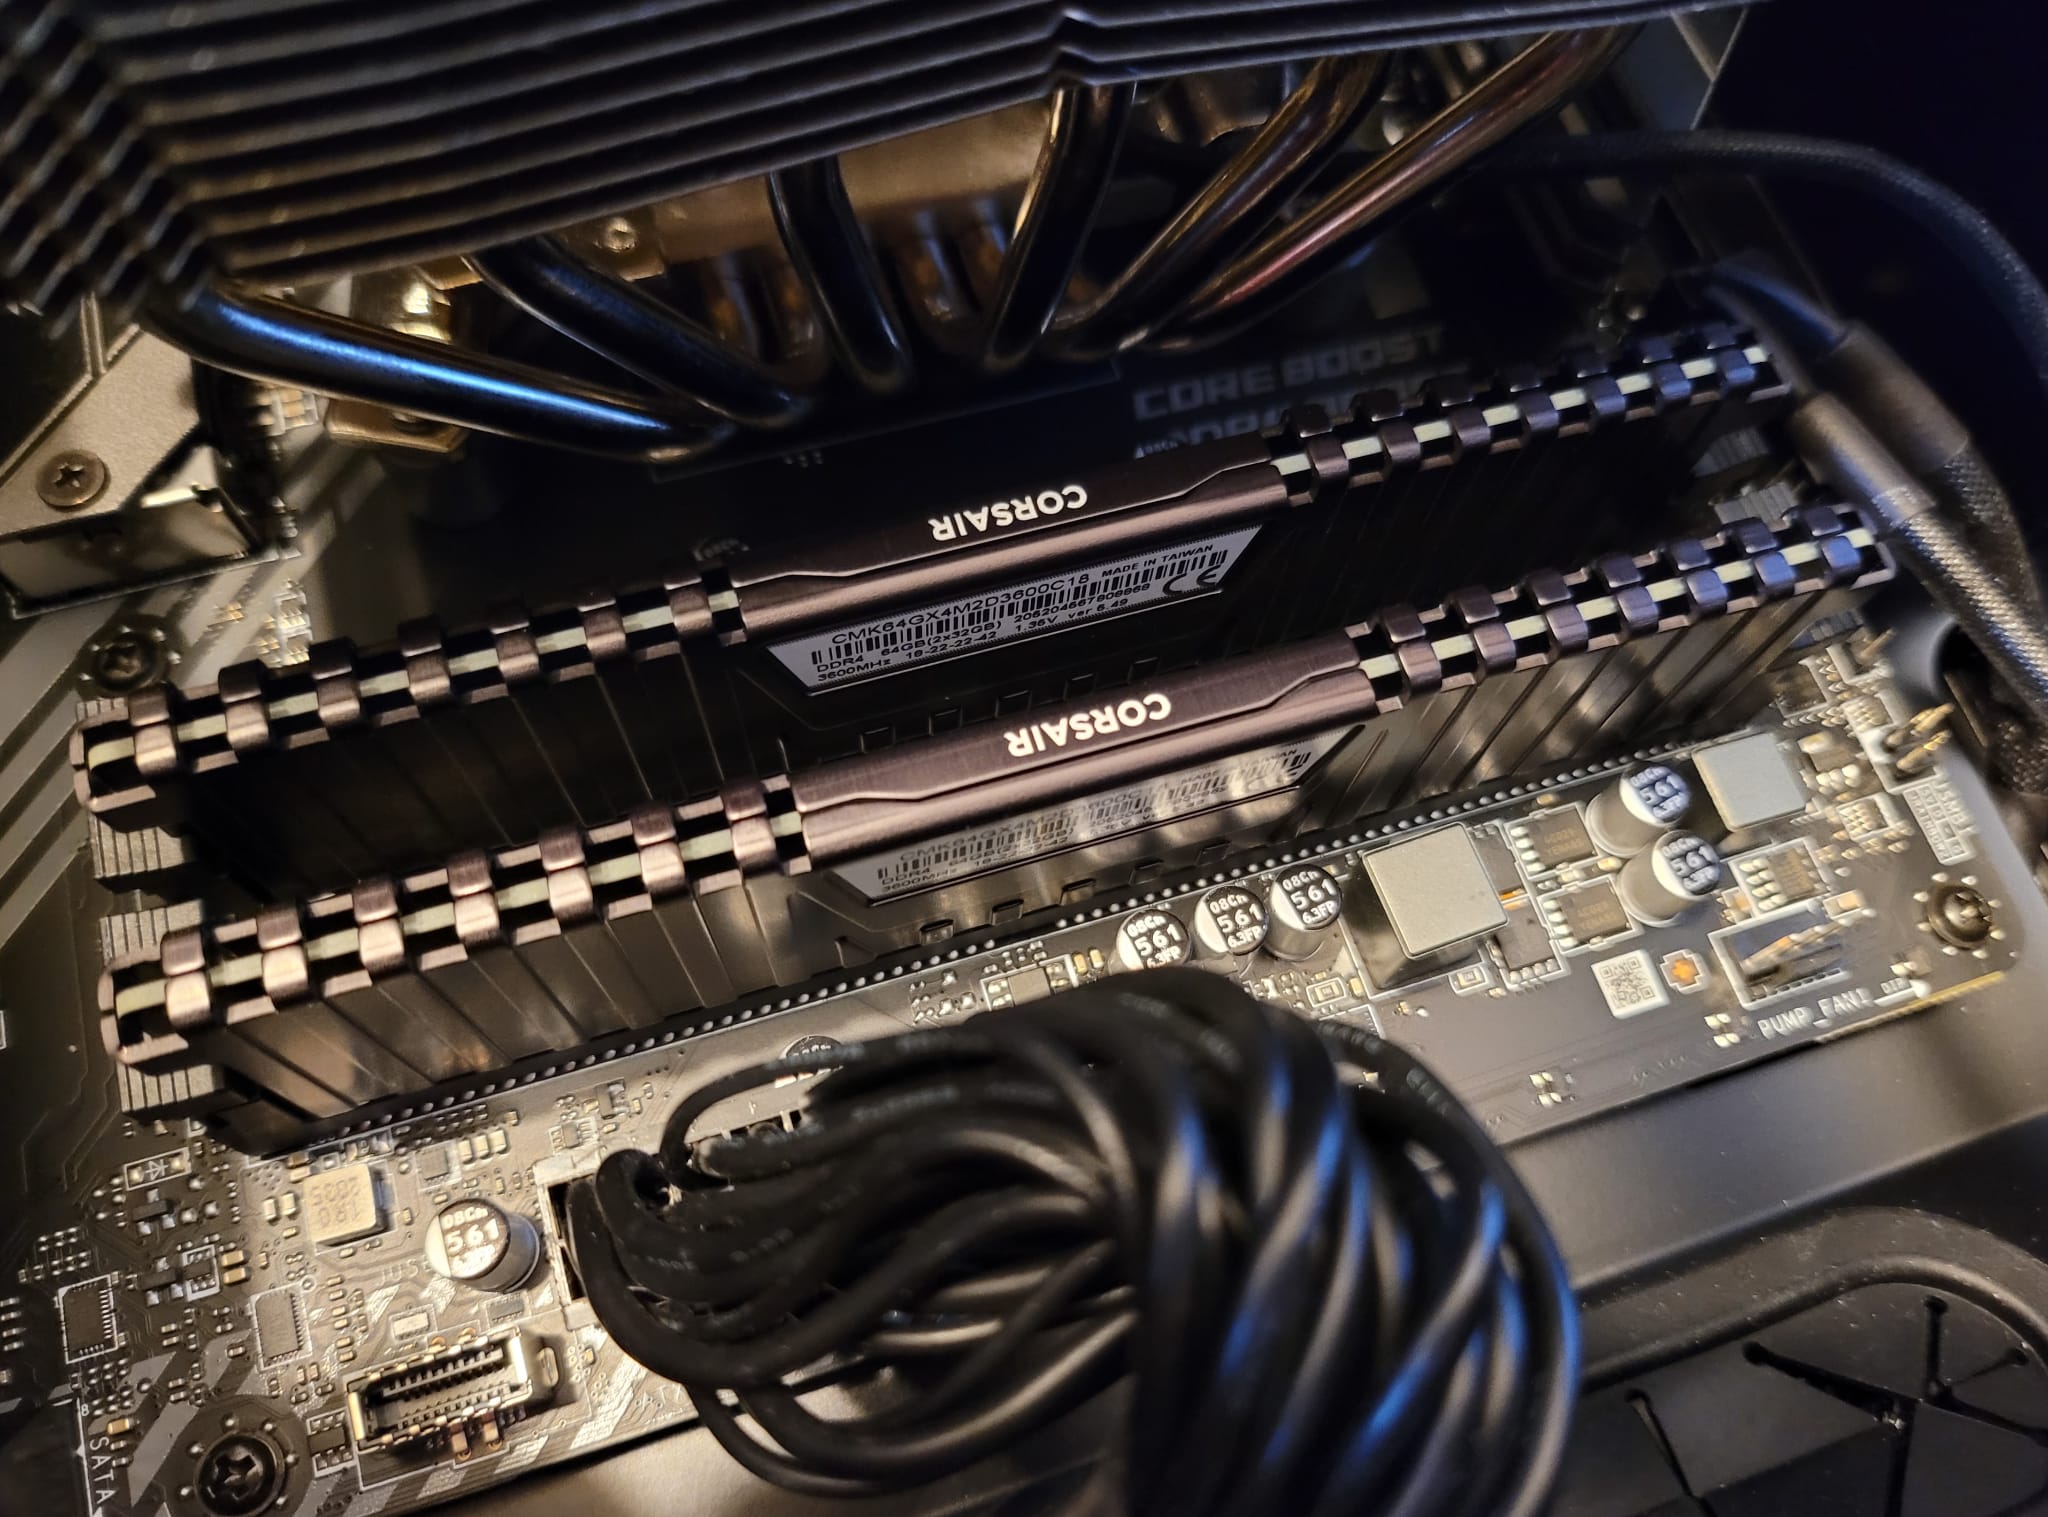
With the Corsair Vengeance LPX memory installed, I cleared the BIOS and selected the XMP profile via the XMP option. The system booted into Windows without any errors, which after several hours or testing with the Patriot Viper Steel memory was a positive result.
Finally, I configured my 24x7 settings and re-ran the suite of benchmarks, which validated the system stability and achieved the following performance results.
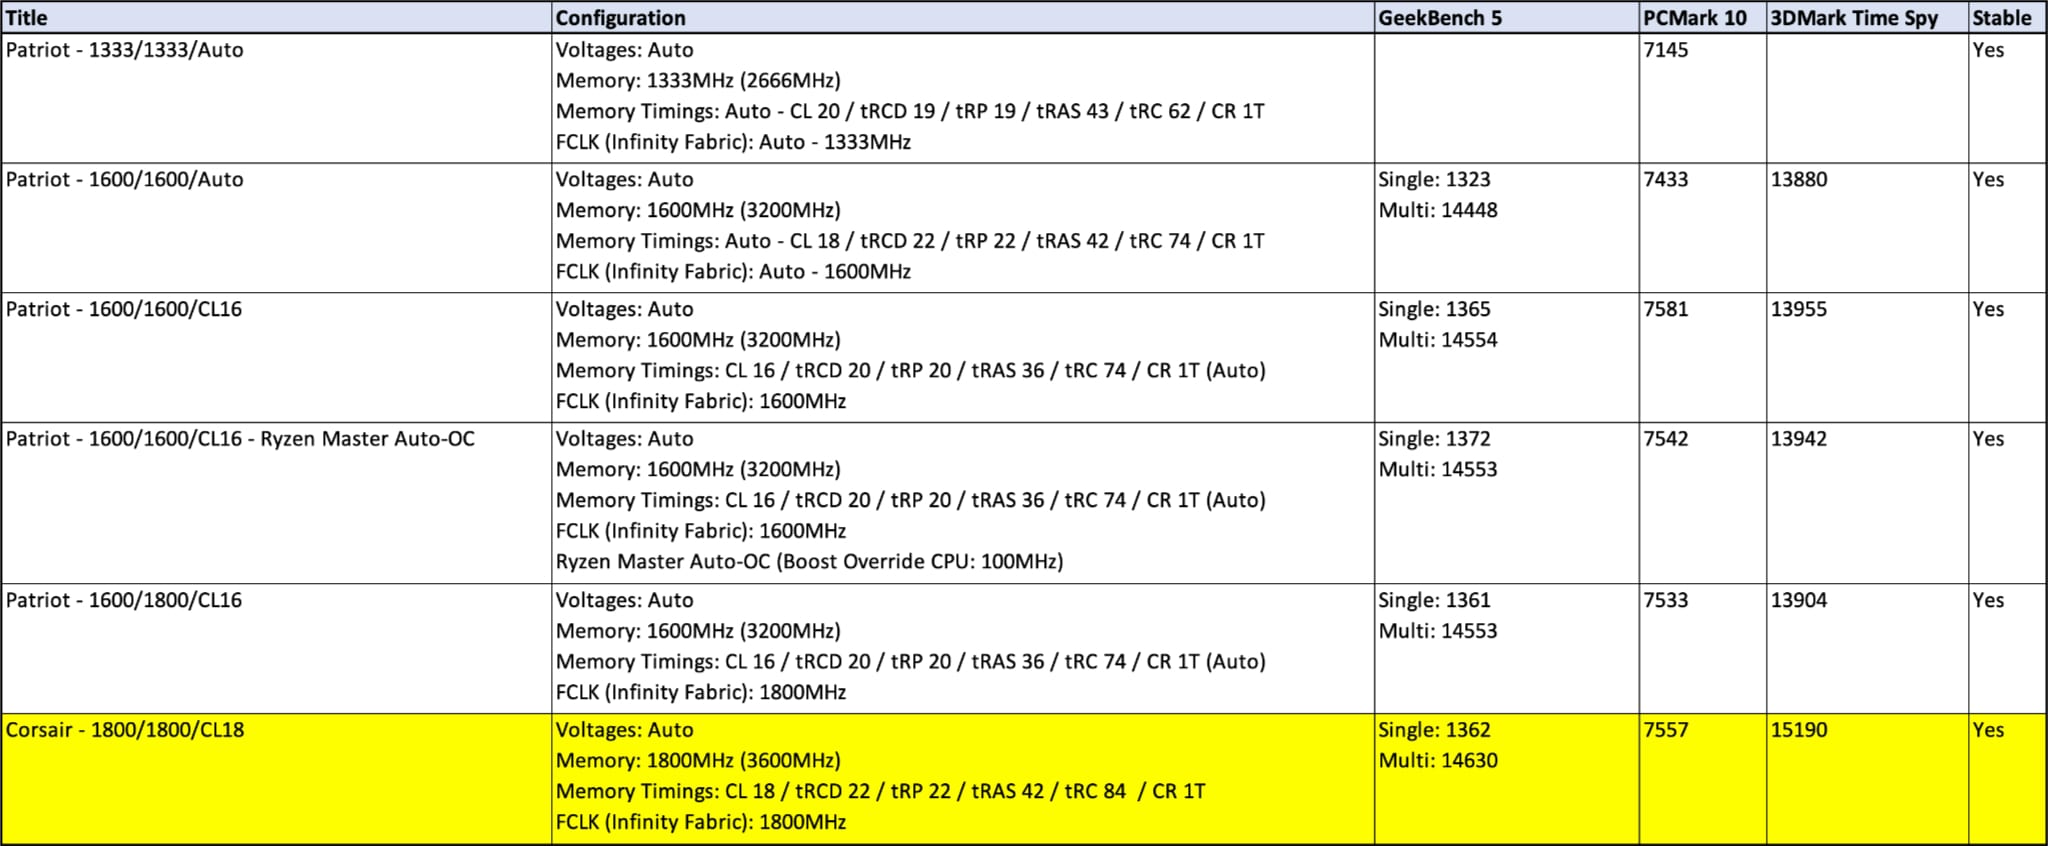
Overall, I am pleased with the build and performance, which has delivered excellent improvements over my old Intel i7-6700K PC.

Unsurprisingly, the biggest gains can be seen across applications that favour multi-threading, allowing the 16 Core / 32 Thread AMD Ryzen 3950X to demonstrate its potential.
Conclusion
In conclusion, my new PC has easily met my expectations, delivering a significant performance boost across my common workloads.
The memory testing was both frustrating and eye-opening, highlighting the importance of motherboard and memory compatibility, which can have a significant impacted on performance and stability (even with comparable memory).
Looking ahead, I plan to watch the graphics card market closely, hoping to see the Nvidia GeForce RTX 3000 Series stock and prices stabilise. At which point, I will likely explore an upgrade, helping to deliver an additional performance boost across gaming, machine learning, and video editing workloads.