Jekyll PWA
I have previously written about Progressive Web Apps (PWA), which aim to combine the flexibility of the web, with the rich user experience of native apps.
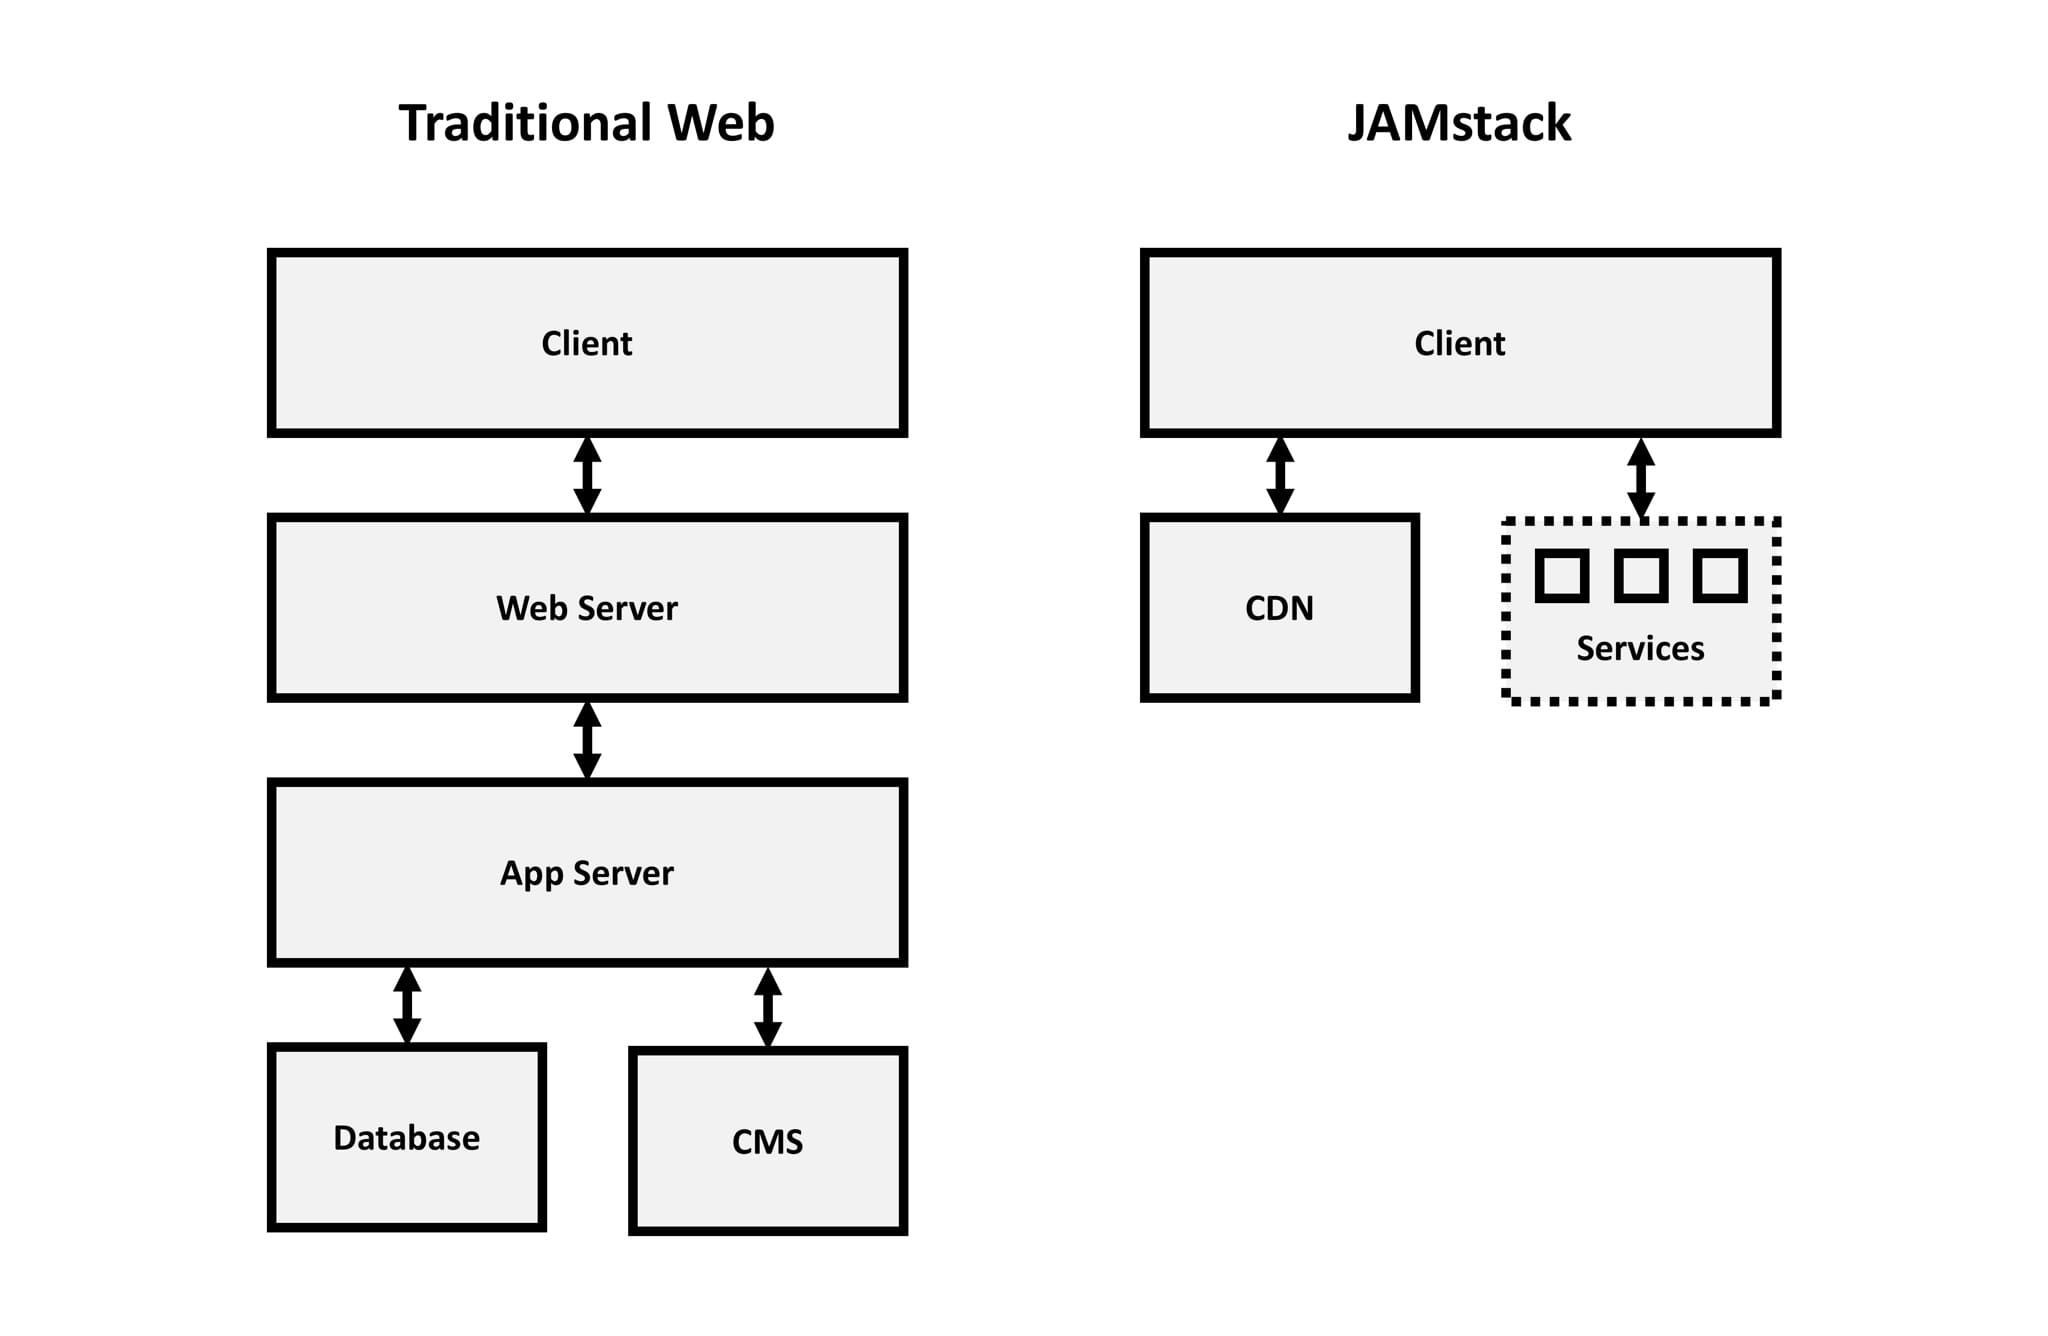
LifeinTECH leverages the JAMstack web architecture, which promotes the use of JavaScript, APIs, and Markup. The goal is to remove the server-side runtime and CMS dependencies, shifting the focus to the client and services.

The specific architecture components of LifeinTECH are outlined below:
- Docker (Automated Build)
- GitHub (Source Code Management)
- Jekyll (Static Site Generator)
- jQuery (JS Library)
- Sass (CSS Preprocessor)
- Disqus (Comments)
- Netlify (Web Host and CDN)
- Let’s Encrypt (Certificate Authority)
In short, Docker is used to run the Jekyll build process, producing the static assets that are then pushed to GitHub and automatically deployed to Netlify.
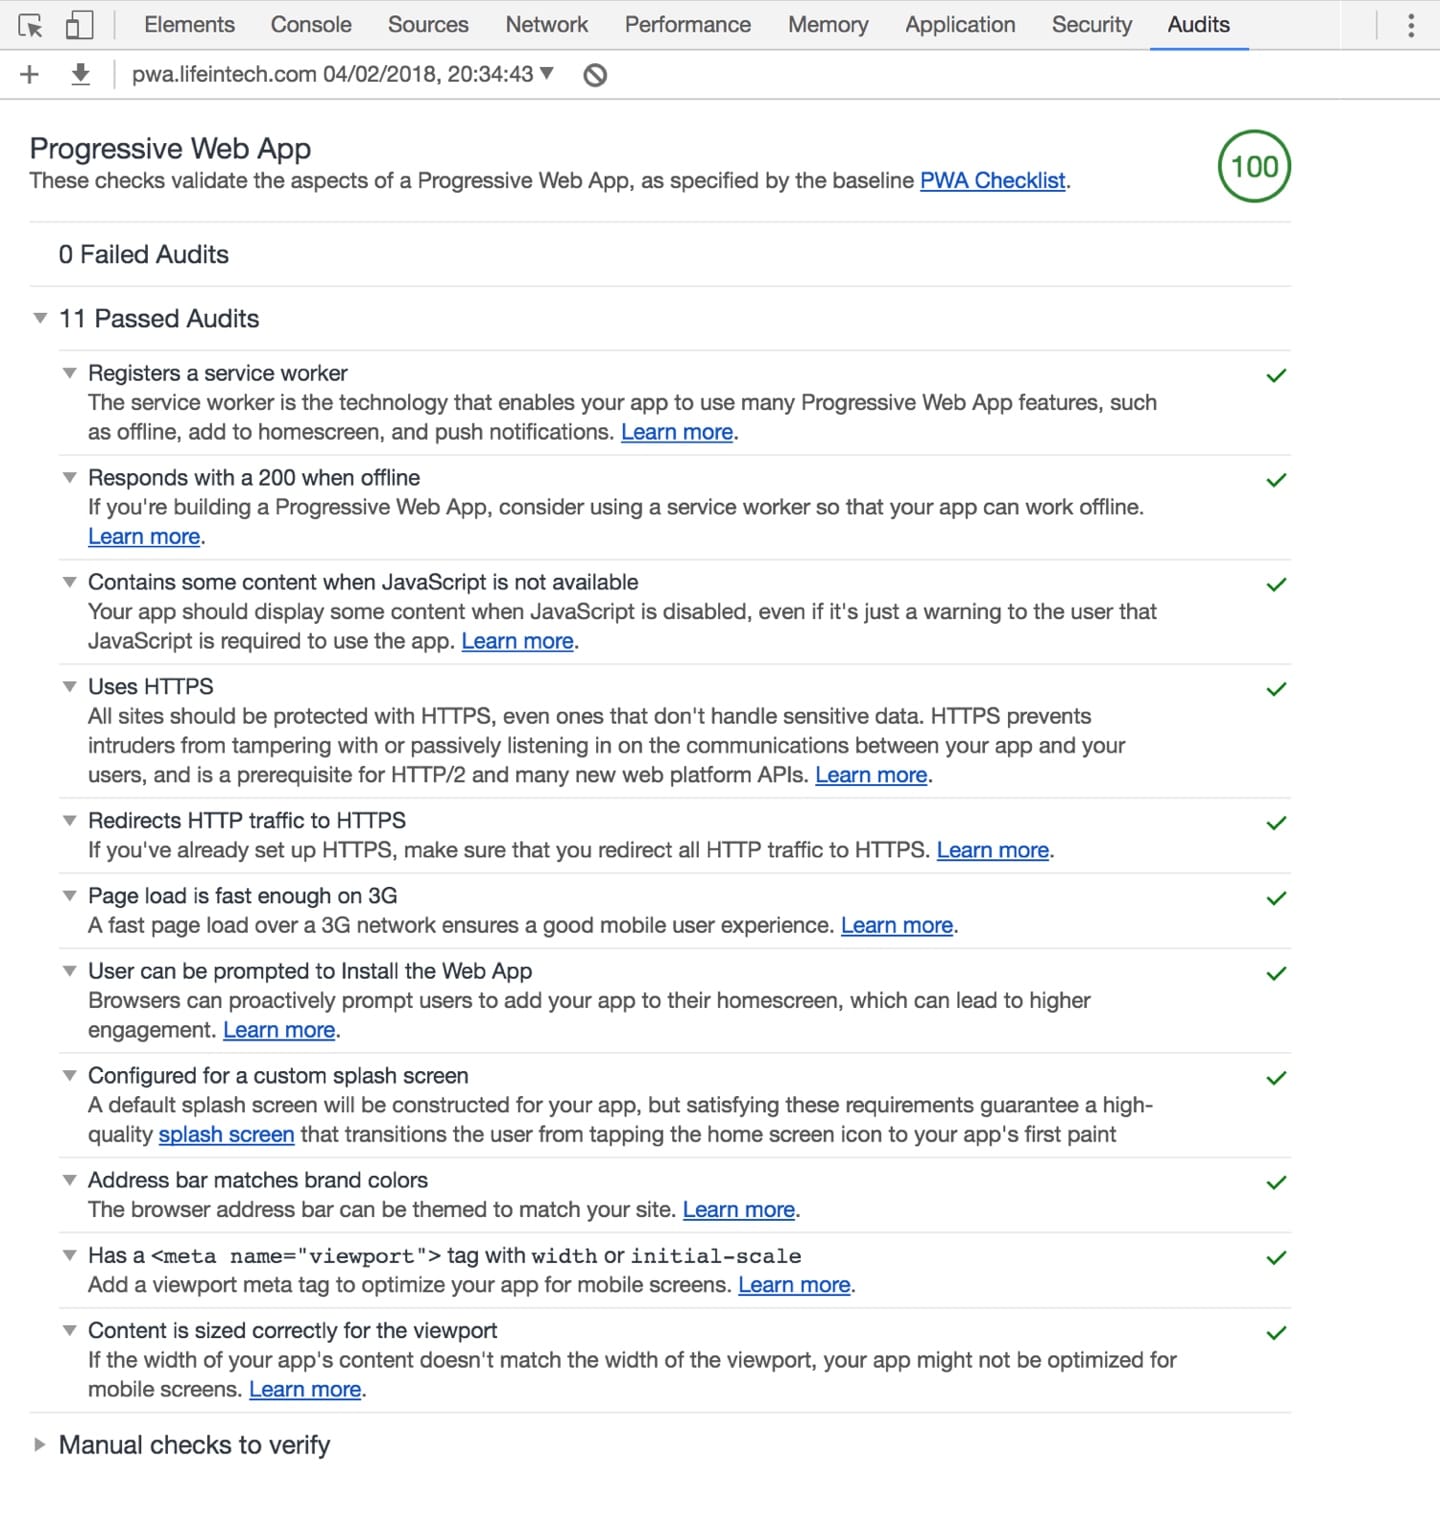
To support my understanding of Progressive Web Apps, I set myself the challenge to upgrade LifeinTECH, aiming to achieve 100% compliance with the Google Lighthouse PWA audit.
Alongside the learning, I hope this upgrade will improve the end user experience of LifeinTECH, resulting in faster performance, offline access and native mobile features (push notifications, etc.)
I have documented the process I followed below.
NOTE: Prior to any development, it is important to note that Progressive Web Apps require SSL. This was a primary driver for my recent migration to Netlify, which simplifies the use of Let’s Encrypt.
Service Worker
As my build process is currently fully automated, I wanted to ensure I reduced the need for any manual steps. As a result, I found an excellent “Jekyll-PWA-Plugin” on GitHub, which installs as a RubyGem and automatically generates a Service Worker that provides pre-cache and runtime cache using Google Workbox.
The advantage of this plugin is that it has been designed to support the Jekyll workflow, therefore it can be easily configured to cache recent blog posts, etc.
To install the plugin, simply add jekyll-pwa-plugin to your Gemfile. You may also need to update your “_config.yml”, as outlined below:
gems:
  - jekyll-paginate
  - jekyll/tagging
  - jekyll-pwa-plugin
Once complete, the following configuration needs to be added to the “_config.yml” file:
pwa:
  sw_filename: sw.js
  dest_js_directory: js
  cache_name: pwa-cache
  precache_recent_posts_num: 12
  precache_glob_directory: /
  precache_glob_patterns:
    - "{js,css,fonts}/**/*.{js,css,woff,woff2}"
    - /index.html
    - /about.html
  precache_glob_ignores:
    - sw-register.js
  runtime_cache:
    - route: /^api\/getdata/
  strategy: networkFirst
    - route: "'/api/pic'"
  strategy: cacheFirst
This configuration prepares the Service Worker (sw.js), as well as copies the required “workbox-sw.prod.js” dependency into your JS directory.
Key configuration items include the number of posts to cache (in my case twelve), as well as the pre-cache glob pattern, where you can specify files, including images, etc.
Once configured, it is as simple as running the build process, which will automatically produce three files: “workbox-sw.prod.js”, “sw-register.js” and “sw.js”.
The “workbox-sw.prod.js” file will be located in your JS directory, while “sw-register.js” and “sw.js” will be located in your web root.
The produced “sw-register.js” file is outlined below. You can essentially ignore this file, as the code is largely generic and simply registers the Service Worker.
if ('serviceWorker' in navigator) {
    navigator.serviceWorker.register('/sw.js?v=1518012075').then(function(reg) {
        reg.onupdatefound = function() {
            var installingWorker = reg.installing;
            installingWorker.onstatechange = function() {
                switch (installingWorker.state) {
                    case 'installed':
                        if (navigator.serviceWorker.controller) {
                            var event = document.createEvent('Event');
                            event.initEvent('sw.update', true, true);
                            window.dispatchEvent(event);
                        }
                        break;
                }
            };
        };
    }).catch(function(e) {
        console.error('Error during service worker registration:', e);
    });
}
The “sw.js” file outlined below is more interesting, as it includes your custom configuration.
importScripts('/js/workbox-sw.prod.v2.1.1.js');

const workboxSW = new WorkboxSW({
cacheId: 'pwa-cache',
ignoreUrlParametersMatching: [/^utm_/],
skipWaiting: true,
clientsClaim: true
});
workboxSW.precache([{"url":"/js/jquery.fitvids.min.js","revision":"933ee1ba75e70b792d6d49d237cb620b"},{"url":"/js/jquery.ghostHunter.min.js","revision":"50ff499db8da8d530d813ff6f4f099ef"},{"url":"/js/script.min.js","revision":"f839794bc07ed5681695843c390e3f3f"},{"url":"/js/evil-icons.min.js","revision":"b77de0fe89ad34da6027b34963cb7c73"},{"url":"/js/jquery-2.1.4.min.js","revision":"f9c7afd05729f10f55b689f36bb20172"},{"url":"/fonts/Born/Born.woff","revision":"2d11011b3ebe66fbc7123e0f4e1a310a"},{"url":"/index.html","revision":"ccc8e26d2124603086b44a6fabfc00f6"},{"url":"/2018/01/25/The-Linux-Foundation/","revision":"aff5d2a51a3328e83d41379fa385851d"},{"url":"/2018/01/19/UK-EA-Forum-Part-Four/","revision":"05966de21a6763478073a83de9259105"},{"url":"/2018/01/14/Meltdown-and-Spectre/","revision":"ed58f70e47129c5339a965819d8eb1f9"}]);
workboxSW.router.registerRoute(/^api\/getdata/,
workboxSW.strategies.networkFirst());

workboxSW.router.registerRoute('/api/pic',
workboxSW.strategies.cacheFirst());
Here you can see the pre-cache, which for simplicity I have reduced to three blog posts. It includes the specific asset (article URL), as well as a hash value, which is used to ensure the cache remains current.
Finally, the Service Worker triggers a custom event (sw.update), when it has finished updating. This provides a simple mechanism to notify active users of any changes (via a toast notification, etc.)
This completes the Service Worker setup, however, you may need to spend some time tuning your cache, finding the right balance between user experience, performance, and storage.
Web App Manifest
The Web App Manifest is a simple JSON file (manifest.json), which is used to control how the app appears and how it is launched. The file itself is easy to create manually, however, you can also use a tool, such as the Web App Manifest Generator.
{
  "name": "LifeinTECH",
  "short_name": "LifeinTECH",
  "description": "Technology and Development",
  "lang": "en-GB",
  "start_url": "/",
  "display": "standalone",
  "orientation": "any",
  "theme_color": "#fff",
  "icons": [
    {
      "src": "images/icons/android-icon-36x36.png",
      "sizes": "36x36",
      "type": "image/png"
    },
    {
      "src": "images/icons/android-icon-48x48.png",
      "sizes": "48x48",
      "type": "image/png"
    },
    {
      "src": "images/icons/android-icon-72x72.png",
      "sizes": "72x72",
      "type": "image/png"
    },
    {
      "src": "images/icons/android-icon-96x96.png",
      "sizes": "96x96",
      "type": "image/png"
    },
    {
      "src": "images/icons/android-icon-144x144.png",
      "sizes": "144x144",
      "type": "image/png"
    },
    {
      "src": "images/icons/android-icon-192x192.png",
      "sizes": "192x192",
      "type": "image/png"
    },
    {
      "src": "images/icons/android-icon-512x512.png",
      "sizes": "512x512",
      "type": "image/png"
    }
  ],
  "background_color": "#fff"
}
Unfortunately, not every browser supports the Web App Manifest. As a result, some gaps need to be closed using traditional meta tags. Outlined below are the tags I included, as well as the link to the “manifest.json” file itself.
<link rel="manifest" href="/manifest.json">

<meta name="viewport" content="width=device-width, initial-scale=1, shrink-to-fit=no">
<meta name="mobile-web-app-capable" content="yes">
<meta name="apple-mobile-web-app-capable" content="yes">
<meta name="application-name" content="LifeinTECH">
<meta name="apple-mobile-web-app-title" content="LifeinTECH">
<meta name="theme-color" content="#fff">
<meta name="msapplication-navbutton-color" content="#fff">
<meta name="apple-mobile-web-app-status-bar-style" content="black-translucent">
<meta name="msapplication-starturl" content="/">

<link rel="apple-touch-icon" sizes="180x180" href="/images/icons/apple-icon-180x180.png">
<link rel="icon" type="image/png" sizes="512x512"  href="/images/icons/android-icon-512x512.png">
<link rel="icon" type="image/png" sizes="16x16" href="/images/icons/favicon-16x16.png">
<meta name="msapplication-TileColor" content="#fff">
<meta name="msapplication-TileImage" content="/images/icons/ms-icon-144x144.png">
<meta name="theme-color" content="#fff">
In the above example, I have not included multiple sizes for each icon. However, this might be advisable, depending on your target audience.
Conclusion
That’s it! Once you have created and configured a Service Worker and Web App Manifest, you should be well positioned to support the key features of a Progressive Web App. This can be confirmed by running the Google Lighthouse PWA audit from the Chrome DevTools.

As you can see from the results, LifeinTECH successfully passes the PWA audit, achieving 100% compliance. The Chrome DevTools also allow you to test and validate the individual improvements, such as performance, offline mode and push notifications, as well as interrogate the local storage.
In my opinion, the local storage (specifically pre-cache) was the most complex part of the process, attempting to find the right balance between experience, performance, and storage. In the end, I managed to achieve a pre-cache state of approximately 5MB, covering the “home” and “about” pages, as well as the most recent twelve posts (including all images).